Dec 6, 2009

You may have used hibernate 2.x and in case you are getting error (Hibernate Dialect must be explicitly set, jdbc connection parameters must be specified, etc) by using the same code to initialize SessionFactory as you did before then there's a simple fix for that error.

  • Create a hibernate.cfg.xml file and place it in root of the classpath and to initialize SessionFactory use the following code.


    AnnotationConfiguration ac= new AnnotationConfiguration().
    setProperties(System.getProperties());
    ac.configure();
    //static final instance of SessionFactory
    sessionFactory=ac.buildSessionFactory();


    or the following code which is the same but uses method chaining:-


    //static final instance of SessionFactory
    sessionFactory=new AnnotationConfiguration().
    setProperties(System.getProperties()).
    configure().
    buildSessionFactory();


this will solve your Dialect or other errors related to configuration you might be facing.

Posted on Sunday, December 06, 2009 by Unknown

Aug 24, 2009

The sysdate.exe file is a trojan and it binds itself with the help of windows registry with the explorer.exe process.So that whenever you start the explorer.exe it starts alongwith it. It has various names like 604.exe,408.exe etc. The sysdate.exe process is stored in the recycle bin or the recycler folder which is hidden.

To heal your computer from the trojan follow these steps:-

  1. The first thing you need to do is empty your temp folder where this trojan maybe stored with different names like 604.exe etc. For this open the run prompt and type %temp% and delete all the executable files in that.

  2. Now you have to delete the actual sysdate.exe file and for that you will have to manually delete it from the RECYCLER folder but the folder is a hidden and system folder so you can not see it in the c drive. So just execute the attrib command with parameters -r -h -s to remove the the attributes(r(Read-only) ,-h(Hidden) ,-s(System)).
    To do the aforementioned task, open the command prompt and type the following command.

    attrib -r -h -s C:/RECYCLER


    Also you have to repeat this step with the actual folder containing the sysdate.exe under the recycler folder. Execute the following command

    attrib -r -h -s C:/RECYCLER /S-1-5-21-832453443-4443154761-431384085-6428


    Here the folder name may vary because the trojan might be stored with a different folder name.

  3. Now actually to delete the file sysdate.exe, you would have to first kill the explorer.exe process from the task manager. Press ctrl+alt+del , Now from the processes tab select explorer.exe process and press delete key or click on end process. Now in the task-manager go to the file menu and select new task and then click on the browse button and navigate to the folder under the Recycler folder containing the file sysdate.exe and Shift+Delete it. Now delete the Recycler folder as well, Don't worry the recycler folder will come back so there's no risk in deleting it.


  4. Now in the new task menu of task manager, type regedit and then navigate to the following key
    HKLM\Software\Microsoft\Windows NT\CurrentVersion\Winlogon
    Now from the right window pane delete the Taskman key. Press F5 to check whether it reappears or not. If it does not then you would have successfully removed the trojan.


  5. Now navigate to the following registry key.
    HKCU\Software\Microsoft\Windows NT\CurrentVersion\Winlogon
    and modify the shell key by removing anything that follows the explorer.exe.


  6. Now in the new task menu of task manager type explorer which will restart the explorer process and your system would be free from the trojan.
Alternate Solution:-

The attrib command can be skipped if you have a dual boot os then just mount the windows partition and delete the files under the recycler folder with ease.

Note: It is always recommended before opening the external drive just open it under the command prompt and delete the autorun.inf file from it.

Posted on Monday, August 24, 2009 by Unknown

Aug 16, 2009

This tutorial provides you with tips on how to get a consistent 100fps or round about that.

Prerequisites:
  • a graphics card external but it maybe the case that an on-board card would suffice.I use nvidia geforce 5200fx 8x agp(accelerated graphics port) slot card. It is pretty cheap and old technology as now pc's come with the pci express slot.
  • a dsl connection >256 kbits/sec: I am pretty sure people would have that much by now.
Settings :

  1. Graphics card Setting:
  • I am displaying with examples of nvidia display driver you should have similar options in ati cards or any other gfx card.
  • Ok so first step is to open nvidia control panel from nvidia icon in taskbar by right clicking on it and choosing nvidia control panel. You can do the same by going to control panel and opening it from there.
  • Now Choose "3d settings" option from the nvidia control panel. After that choose "adjust image settings with preview" don't worry if you don't find that option the important point is you have to edit 3d settings.
  • Then choose "use advanced 3d settings " and click on take me there as shown in figure.
  • Choose Global Settings tab and then choose texture filtering option and select high performance from drop down list as shown in the figure below. This option is most important as it will cause sharp rise in your fps.
  • Now choose Vertical sync option and select force off ,Also turn the anisotropic filtering to application controlled (as it is not allowed to be turned off in tournaments) and anti aliasing to off. One more thing if your graphics card is dual display card then choose hardware acceleration to single display performance mode. Apply these settings and move to game configuration part.
2. Configuring Counter Strike/CS1.6 :
  1. Configuring start up options and launch parameters:
  • Right click on the shortcut to your game and select properties then in the target field append the parameters -noipx -sv_lan 0 +heapsize 250000 +sys_ticrate 1000. For example "C:\Counter-Strike 1.6 + Half-Life\hl.exe" -game cstrike -noipx -sv_lan 0 +heapsize 250000 +sys_ticrate 1000" and in case of steam append it after the -applaunch 10 parameter.
  • Now launch the game and open the console by pressing '`' character and type fps_max 101 and after that r_decals 300 , rate 25000 , cl_updaterate 101 ,cl_cmdrate 101 . because they must match your fps rate for better registry.
  • Now go to video options and select open gl mode with resolution of your choice, i personally use 800*600 resolution.

That's it you should get 100 fps (hovering around 99-100). Do post your comments in case you find this post helpful or encounter any problem .

--Update
After CS 1.6 update some users might experience green screen issue and game would not be playable so put the following parameters in launch options  and you will get more than 100 fps

-gl -noforcemparms -noforcemaccel -noforcemspd -nofbo -nomsaa

---Update 2

For disabling vertical sync in-game type the following command.
gl_vsync 0

If you do not use the above command or disable vertical sync in game you might not get 100 fps.

---Update 3
You can get more than 100 fps in cs now. Just type fps_max , for ex fps_max 500 and then type fps_override 1

You can also enable low video quality option to get 100 or more fps on other machines easily.

Enjoy :-)

Posted on Sunday, August 16, 2009 by Unknown

The dual core and quad core processors have become very popular nowadays but the main reason behind their success is the power management.

There are two basic concepts that one must know, they are :-

Overclocking the processor :-

Let's say that ideally a normal single core processor takes x units of power to give x units of performance. But users generally tend to increase the performance by overclocking the processor ie essentially increasing the clock frequency of the processor. If a user follows the process of overclocking the processor, then the performance increase is about 12-13 percent but the power increase required for that would be about 70 percent.

Under-clocking the processor :-

Now the interesting concept is what if we under-clock the processor that is decrease the clock frequency of the processor?

In this case we could get about 80 percent of the performance at roughly half the power. For example we would get .8x units of performance at .5x units of power.

Now this is the concept that is utilized by the dual core processors and instead of using a single processor we combine the two processors and operate each one of them at half of it's power and so for the same power taken by the normal single core processor we get about 70 percent increase in performance. The aforementioned reason is the core reason behind the success of dual core processors.

Another major factor in dual core processors is as they operate at lower clock rates it helps in reducing the speed mismatch between the processor and the memory and this is a relevant factor because with processor clock rates increasing at very faster speeds the corresponding increase in clock rates of cache memory is not their, therefore a processor's clock cycles are not utilized properly and are wasted in memory read/write cycles.

Hence the concept of under-clocking helps also in reducing the speed mismatch b/w the memory and the processor.

Posted on Sunday, August 16, 2009 by Unknown

There are a few steps that you have to follow before you can create a dedicated server (Hlds) for counter strike 1.6

The steps are :-

1. Configuring the router/modem: Follow these steps:-
  • Open any web browser and in the address bar type 192.168.1.1/main.html or 192.168.1.1/index.html or 192.168.1.1 , whichever provides you with advanced configuration menu.
  • After this a pop-up will ask you about the user name and password. The default user name and password pair's are admin, admin or admin, password, enter other values if you have modified the default settings.
  • Then choose advanced setup-> Nat -> Virtual servers (don't worry if you cannot find the exact sequence, what really matters is that you must be able to find the virtual servers option)
  • Now, choose add a virtual server and repeat the following steps for opening the ports shown in the table.

    a) Type the service name as shown in the table
    b) Type start port as start port shown in the table
    c) Type end port as port shown in the table
    d) Choose the protocol as shown in the table
    e) Type 192.168.1.5 as server ip
    f) Press add server button.
  • Server name Start port End Port Protocol
    Half life 6003 6003 TCP and UDP
    Half life 7001 7001 TCP and UDP
    Half life 27005 27005UDP
    Half life 27010 27015 UDP
    Half life Server 27015 27015 UDP
    Half life Server 27016 27016 UDP
    After these steps the virtual server configuration of the modem should look like the following figure.
  • This finishes the modem's setup. Just note the DNS (Domain Name server) ip in the modem's wan info page, it will be used later.
2. Configuring the Local area Connection :-

  • Open the control panel and switch to classic view.
  • Then open network connections.
  • Right click on the Local area Connection and choose properties.
  • Then scroll down and select The Internet protocol( Tcp/Ip) option and click on properties button (refer to the following figure).
  • Choose the "use following ip address" radio button and enter the following:-
    a) Ip address: 192.168.1.5
    b) Subnet mask: 255.255.255.0
    c) Default gateway: 192.168.1.1
    d) Preffered DNS server: Enter the address that you noted in at the end of step 1


3) Adding the exception to windows firewall: The last step is to add the exception in the windows firewall for the hlds server.

That's it you are done . Do post comments in case you encounter any problem

Posted on Sunday, August 16, 2009 by Unknown

In this tutorial i will be explaining about following two things

1) Creating your own spray paint image.
2) Converting images to counter strike sprays.

1) Creating your own spray paint image : for this follow these steps
  • open a simple paint program, i am using microsoft paint for this example.
  • paint your own image and then there are following 2 options available to you.
  1. Transparent Background: If you want your images to have a transparent background then in microsoft paint or any other paint program set its background to blue.
  2. Normal background: This is rarely the case that you would want to have because it displays a big background to your image that looks cheap.
  • Now that you have created your image save it as .bmp extension for clarity and then proceed to second step.
2) Converting images to counter strike sprays : for this follow these steps
  • Download decal converter from here and extract the rar archive file.
  • Open the folder decal converter and then open decal converter.
  • Now you will have to set the path in decal converter where you have installed your counter strike. For this go to the options menu and select "half life Games folders" option then choose browse and find your cs installation, check the "default game for decals " option and then press OK.
  • Now go to the file menu and select "open picture option" then choose the image for which you want to make the spray.
  • The decal converter will automatically re size the image. You have the option of resizing image by increasing the height or the width of the image but since the maximum number of pixels allowed is limited you would have to decrease the width or height correspondingly.
  • Now go to the "decal" menu and choose "makedecal" option, Then the decal file will be created in the game directory as "pldecal.wad".
  • Now delete the old "tempdecal.wad" and "custom.hpk" files and rename the pldecal.wad to tempdecal.wad and make it read only.
  • Now you are done, go in game and start spraying :)
Note: if your spray is not working go to the game directory and delete the custom.hpk file again (that sick file will keep on reappearing :( )

Posted on Sunday, August 16, 2009 by Unknown

If you want to verify your blogger site on msn follow these simple steps:-
  • Go to the msn site

  • Then do not directly submit your site url, first visit the link at bottom that says webmasters (as shown in figure below). I could have provided you this link directly but i did not because most of the users end up entering their site at the first link and that gives them no control over the site information.


  • Then the page will have a button that says "sign in to use the tools" press this button and then login with your userid and password. you will be redirected to webmasters tool and then there will be a button that says "add a site", click on it.

  • Then fill up the form as follows:-
  1. Enter the web site address. For example if you have your site address as http://abc.blogspot.com then enter only abc.blogspot.com. Note: this is the place where people generally mess up the url and in previous example may end up entering www.abc.blogspot.com. it is to be noted that your blog address does not have a www prefix so do not enter the www prefix.

  2. Now submit a sitemap link as yoursite.blogspot.com/atom.xml . Here replace yoursite.blogspot.com with your blog address. After this enter the email address that you want to use as contact information and then press submit.

  • After the last step you would be redirected to authentication part. Now scroll down to see meta tag verification, copy the meta tag and then proceed to the next step.

  • Adding meta tag in your blogger site : Login to your blogger account and then Go to the Layout option after that click on the Edit Html tab and then in the edit template section paste the meta below the code fragment as shown below. Make sure that you append the closing tag if it is missing. for example if tag is like this <meta name="xyz" content="ahshshhsh" > then change it to <meta name="xyz" content="ahshshhsh" />


  • <head>
    <b:include data='blog' name='all-head-content'/>


  • Click the save template button and then login back to the webmasters tool in msn and click on the site after which it will be authenticated.

Posted on Sunday, August 16, 2009 by Unknown

Aug 15, 2009

Here i discuss about the tool that is of paramount importance in a situation where you do not have time to defragment the entire drive and just want to defragment single file /folder in windows xp.

The tool i am discussing about is Contig it was developed by sysinternals and can be downloaded here. It is a tool that is operated through the command line.

The first thing you should do is download the tool it's only 100kb in size.


How To Use it ?


1. After downloading and extracting it, Open the command prompt on the folder containing the tool(use command prompt here tool) or for example If the tool is extracted in C:\abc then open command prompt and type cd "C:\abc" to make it the current directory. You can also set the path variable once and for all, see the tutorial on how to set the path variable [link] and after that the command can be invoked from any folder.


2.The tool has the following command line structure and options:

Command Structure : Contig [-options] filename.

Options:

1) v : for providing verbose output of the ongoing operation.

2) a : for analysis that is providing information of how fragmented a file or files have become.

3) q: The quiet mode switch , which over-rides the -v switch, makes Contig run in "quiet" mode, where the only thing it prints during a defrag run is summary information and no information regarding the ongoing operation is displayed.

4) s: Use the -s switch to perform a recursive processing of subdirectories when you specify a filename with wildcards.

For more options just type contig it will display the command help

Usage Examples:

1)If you want to defragment the entire directory and all the files under it then use the following command

contig -v -s "directory path\*.*"

For example: in my case directory is "C:\wamp" and i am using quiet mode ie -q option, So the command will be

contig -q -s "C:\wamp\*.*"

Output Image:


2)If you want to just defrag one file then simply use contig c:\dir_path\file_name .

Do leave your comment if post was helpfull.

Posted on Saturday, August 15, 2009 by Unknown

Jul 31, 2009

Installing php:-
  • Download the zip archive of php from this site.
  • Extract the archive to a c:\php or any name that you like but in the entire explanation c:\php is assumed to be the path where php is installed so replace it with the path to your directory in case you choose to install it in another directory .
  • Rename the php-ini-dist to php.ini because it is the configuration file for php.
  • This completes the basic install and now you can change the configuration parameters in the php.ini like the timezone, displaying errors etc.
Configuring apache web server(almost all people use it):-
  • Then you will have to configure apache web server and that's the tricky part because there are compatibility issues between the apache web server version and the php installation.
  • If you have the php version 5.2.10 then you can configure it for apache web server 2.0.x but the php version 5.3.0 comes with support only for the apache web server 2.2 or greater so you should check the version of apache that you have before downloading php or vice versa.
  • Configuring Apache 2.0.x :-

    • If you have apache 2.0.x then you should download php version lower than 5.30 as it only supports the apache web server 2.2.x
    • Open the apache configuration file httpd.conf and search for "LoadModule" and after the last LoadModule directives just copy and past the following code.

      #php5 module for apache 2.0.x web server LoadModule php5_module "c:/php/php5apache2.dll" #Tell apache web server to recognize the .php extension AddType application/x-httpd-php .php #The php.ini directory assuming it to be the same as c:/php PHPIniDir "c:/php" #end of php5 module

    • Note that we are loading php as a module into the apache web server but you can also load it as a cgi binary. Also note that the dll that was loaded is php5apache2.dll which supports apache 2.0 web server.
  • Configuring Apache 2.2.x :-
    • The steps remain the same but in this case you have the option to download the php 5.3.0 version but lower versions of php also support the apache 2.2.x web server because they contain the php5apache2_2.dll required for the apache 2.2.x server.
    • Just copy and paste the following code at the end of LoadModule directives in the httpd.conf file and i am assuming the installation directory of php is c:\php.

      #php5 module for apache 2.2.x web server LoadModule php5_module "c:/php/php5apache2_2.dll" #Tell apache web server to recognize the .php extension AddType application/x-httpd-php .php #The php.ini directory assuming it to be the same as c:/php PHPIniDir "c:/php" #end of php5 module


    • In this case note that only change is in the LoadModule directive which loads the php5apache2_2.dll which is loaded by the apache 2.2.x web server.

  • Save the http.conf file, restart the apache web server and create a simple test script and place it in the apache htdocs directory. In the test script type and save it as test.php in the apache htdocs directory. Open the browser and type http://localhost/test.php, the installation if successful will show the page containing details about php installation and apache web server.


Activating mysql support for php:-
  • Open the installation directory of php i.e c:\php and then open the php.ini file and search for ;extension=php_mysqli.dll and remove the semicolon in front of it if you have mysql version 4.1 or greater because the mysqli(improved) dll file is for mysql version 4.1 or greater but if you have an older version (although it is highly unlikely) then remove the semicolon from the line that says ;extension=php_mysql.dll .
  • Open the ext directory under the directory where php is installed and if your mysql version is 4.1 or newer then copy and paste the php_mysqli.dll file from it to the main directory i.e directly under the c:\php directory or else copy and paste the file php_mysql.dll.
  • Note that there should also be a libmysql.dll file directly under the main directory,if not then copy and paste that file from the directory similar to the "C:\Program Files\MySQL\MySQL Server 5.0\bin" directory.
  • Now you have to set the path variable by appending c:\php directory path into it so that php can find the 2 above mentioned dlls required for mysql support. To see how to set the path variable see this link.
  • Reboot the pc and start the apache webserver, open browser and type the url to the file we created earlier i.e http://localhost/test.php and if everything goes fine you should see the output similar to the image shown below. This completes the installation of mysql support for php.


Posted on Friday, July 31, 2009 by Unknown

Jul 23, 2009

The dynamic dns service can be used by any person with a non-static ip address to host a website on pc. Non- static ip address means that a person who is using services of an isp and so generally every time he resets his router or modem a new ip address is assigned, so the binding of a domain name to the ip address just cannot happen. The dynamic dns service can be used for this purpose to bind the non-static ip-address to a domain name by constantly updating the ip-address with the domain name provider thus a normal user can host his/her website on pc.

To get the dynamic-dns service up and running for no cost, follow these steps:-
  • Register yourself at this site: http://www.dyndns.com/

  • Get a free or paid dynamic domain name registered with the site.

  • Download and install the tool dynamic dns updater from this link.

  • Launch the tool and open the groups tab, then click on the add button, choose a name for the group, enter the user-name and password for the account that you had earlier established with the site (dyndns.com) and finally click on the download button.

  • After clicking on the download button it will download the details of the domains that have been registered for that user account after which it will update the domain name with your ip-address.

  • If you want to host your website on your own pc and want complete configuration for it then check the following link, where i have explained all the topics like configuring modem, apache, php, etc on your pc.

    Host Website on Pc

Posted on Thursday, July 23, 2009 by Unknown

Jul 21, 2009

The first thing that you should know is that Timer class is available both in java.util and javax.swing packages and they both are different from each other.

I will be discussing code example about the Timer class in javax.Swing package which you can use to make a countdown timer, JprogressBar or do other operations.

Below is the code example and then the explanation follows:-
import java.awt.event.*;
import javax.swing.Timer;
/**
*
* @author  morph
*/
public class timer_Example extends javax.swing.JFrame implements ActionListener {
Timer timer=null;
javax.swing.JLabel label=null;
static int counter=0;
/** Creates new form timer_Example */

public timer_Example(){
//your code goes here
label=new javax.swing.JLabel("The time is 0 seconds");
this.getContentPane().add(label);
this.pack();
timer=new Timer(1000,this);/*create a timer that generates an event after 1 second and pass it the frame object which handles the action event by implementing the ActionListener interface*/
timer.start();
}

public void actionPerformed(ActionEvent e){
if(counter==100)
{
timer.stop();
}
javax.swing.SwingUtilities.invokeLater(new updateCount());
}

public class updateCount implements Runnable{
public void run(){
counter=counter+1;//update the counter value
label.setText("the time is "+counter+" seconds");
//your JProgressBar code can go here
//or any other code that you may like
}
}
public static void main(String args[]) {

timer_Example form=new timer_Example();
form.setVisible(true);
form.setDefaultCloseOperation(javax.swing.JFrame.EXIT_ON_CLOSE);
}


}

The code is pretty basic but this code can be used to perform various tasks. In the code we initialize the counter to 0 and then create the timer object by calling its constructor and passing it 2 arguments the time in milliseconds after which the timer shall generate an event (timer generates an ActionEvent) and second parameter is an event handler for the action event which in this case is the form object itself.

The actionPerformed function just simply checks whether the count has reached 100 or not and if it has it stops the timer. Otherwise it creates a new runnable object of a nested class updateCount which updates the count value and displays the count value through the JLabel. Here you can do other things like updating the JProgressBar or any other event that you may wish to implement. I have used SwingUtilities.invokeLater() function because it is always recommended that you should place the call to some other class on an event queue and not directly call the class.

I have used a similar concept to develop a simple application in java that performs various operations like Shutdown, Hibernate, Standby, lock etc but in that case the counter is countdown counter. You can also create beautiful application launcher windows with changing backgrounds and updating progress bar with it.

Posted on Tuesday, July 21, 2009 by Unknown

Jul 20, 2009

In case you change the password for root account using phpMyAdmin and then try to login into mysql database using phpmyadmin you will receive a log in error and you won't be able to login, this happens because phpmyadmin has no way of knowing what's the root password that you have set.

The phpmyadmin uses it's config.inc.php file for storing mysql user related information and that is where you should enter the root password so that on next log in it can successfully log in to the mysql database.

The solutions to update the password are explained below:-

  1. For Wamp Server:- If you have installed wamp server then follow these instructions
    • Open the apps directory under the directory of wamp server. i.e /wamp/apps
    • Now open the phpmyadmin directory and then open the config.inc.php file
    • Navigate to the line that says "$cfg['Servers'][$i]['password'] = 'xxxx '" and replace the xxxx with the password for the root user and save changes.
    • Now log into the mysql database using phpmyadmin and your login will be successful

  2. For Standalone installation:- In case you have installed phpmyadmin as a standalone version then just navigate to the directory of phpmyadmin and then you can follow the aforementioned solution steps.

Posted on Monday, July 20, 2009 by Unknown

Jul 6, 2009

Problem:-You encounter this error while executing your jar file then it is likely due to missing library files that your jar file needs to run.

Solutions:-

For applications made using NetBeans Ide:-
  • Netbeans while making your jar file adds the classpath of the libraries needed for your application to the manifest.mf file and creates the folder lib in the dist folder containing the jar files that your application needs to execute.

  • If you copy and paste just the jar file and try to execute it it will raise an error, so instead of just copying the jar file copy the entire dist folder and then execute the jar. It will work.
For applications made without the Ide:-
  • To add the path of class libraries that are missing just create a plaint text file and then add the class path of the libraries to it. for example if you are getting error for the missing class file org.apache.tools.bzip2.jar located under the xyz directory then you should add the variable as it is shown Class-Path: xyz/org.apache.tools.bzip2.jar and save the text file. Then you should execute the following command.

    jar cfm "Your jar File" "The text file you edited" "the files to add into the jar"

  • Now run the application using the command "java -jar application_name.jar" and it should work fine.
In case you still face problems regarding this issue post your problem and i'll solve it.

Posted on Monday, July 06, 2009 by Unknown

Jun 28, 2009

What is a servlet ?

Servlet:a short introduction:-
A servlet handles the requests from the server, that require servlet to add something or do some operations in response to the client request so that a dynamic page can be generated, rather than the same old monotonous static html pages.

The servlet API's are generally provided along with Containers like tomcat, JBoss etc and you have to import the servlet-api.jar for compiling your servlet .java files. A java servlet does not have a main method so it is the container that controls the execution of servlet methods. The container initializes the servlet by calling it's init method, after which it's service method is called which determines that which of the servlet's method is to be called depending upon the client request and after a servlet's job is done it purges it's resources by calling it's destroy method.
The container also provides support for JSP.

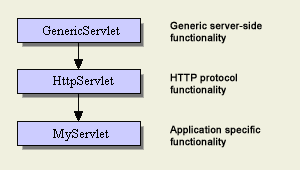
The servlet class that you will implement let it's name be MyServlet , will generally extend the HttpServlet class that extends the GenericServlet class so the class hierarchy will be as shown in the following figure.


The servlet class that you will implement will most likely implement either of the following two methods:-

  1. public void doGet(HttpServletRequest request,HttpServletResponse response) throws IOException{ //code here}:-

    If the client uses the http Get query, then this will be the method that will be invoked by the container to handle the Get request. It takes reference to two objects HttpServletRequest and HttpServletResponse object, these objects are created by the container and their reference is passed to this method. A client will use a Get http request, If the amount of data to be sent is less, the data sent using get request is visible in the browser navigation bar, so you would not want to display sensitive information like user password, for that you will want to use the Http Post request .

  2. public void doPost(HttpServletRequest request,HttpServletResponse response) throws IOException{ // code here }

    If the client uses the http post request then this will be the method called by the container by looking at the client request. It is used when the amount of data to be sent is more, like filling up the html form and sending it to the server to process it and also when sensitive information like user password is to sent.
An example servlet :-

The example servlet(infoServlet) will be the most basic servlet, It will take the parameter user-name and password, perform some fake authentication (authentication won't actually be done) and display a welcome message to the user along with the current date and time.

The servlet code is given below and the explanation follows:-
import javax.servlet.*;
import javax.servlet.http.*;
import java.io.*;
public class infoServlet extends HttpServlet{
public void doPost(HttpServletRequest request, HttpServletResponse response)throws IOException,ServletException
{response.setContentType("text/html");
PrintWriter output=response.getWriter();
String name=request.getParameter("text_field");
String password=request.getParameter("password_field");
Date now = new Date();
//No authentication will be done
output.println("&lt;html&gt;"+"&lt;head&gt;"+"&lt;title&gt;"+
"Welcome page"+"&lt;/title&gt;"+"&lt;/head&gt;"+
"&lt;body&gt;"+"Welcome "+name+"&lt;br/&gt;"+
"The time is"+now+"&lt;/body&gt;"+"&lt;/html&gt;");
}

In this servlet we have implemented the doPost method as the client will be sending the sensitive information in a post request.

The method setContentType("content_type"); tells about the response mime type to the client browser so that it can display the page received properly.
Then we obtain a printwriter object reference by invoking the getWriter() method on the response object, which is used to generate the dynamic response page for the client.

The getParameter("field_name") gets the parameter value entered by the user in the form.

Now save the java file as infoServlet.java .

Compiling the servlet:-

To compile the servlet follow these steps:-
  • Open the command prompt and navigate to the directory where the infoServlet java file is saved.
  • Now to compile the servlet execute the following command.
    javac -classpath "C:/Program files/Tomcat6.0/lib/servlet_api.jar" infoServlet.java

    Here replace the classpath (the path between the quotes) with the path to your servlet_api.jar file provided by the container that you are using.
Deploying the servlet:-

I am here using the tomcat container, the deploying part may vary depending upon the container that you use.
  • Create a directory under the tomcat6.0/webapps directory, name it proj1 then under the proj1 directory create a directory WEB-INF , then create a directory classes under the WEB-INF directory.
  • Copy the generated class file into the classes directory.
Deployment Descriptor (DD):-

Now you would have to create the deployment descriptor ie the web.xml file that tells the container about information such as where the servlet class file is placed, what is the deployment name that you are using, what will be the name by which client will call the servlet and obviously various other parameters.

The deployment descriptor is given in the following code-box, copy the contents and save it as web.xml
&lt;?xml version="1.0"?&gt;
&lt;web-app xmlns="http://java.sun.com/xml/ns/javaee"
xmlns:xsi="http://www.w3.org/2001/XMLSchema-instance"
xsi:schemaLocation="http://java.sun.com/xml/ns/javaee
http://java.sun.com/xml/ns/javaee/web-app_2_5.xsd"
version="2.5"&gt;
&lt;servlet&gt;
&lt;servlet-name&gt;TestServlet&lt;/servlet-name&gt;
&lt;servlet-class&gt;infoServlet&lt;/servlet-class&gt;
&lt;/servlet&gt;
&lt;servlet-mapping&gt;
&lt;servlet-name&gt;TestServlet&lt;/servlet-name&gt;
&lt;url-pattern&gt;/submit&lt;/url-pattern&gt;
&lt;/servlet-mapping&gt;
&lt;/web-app&gt;

Explanation:-

One should not worry about the webapp tag just copy and paste it.

The <servlet> tag:- It defines the properties relating to your servlet. In this case we map the deployment name ie the name specified by <servlet-name> tag , to the path to actual class file i.e the name specified by the <servlet-class&gt tag; i.e the infoservlet, notice here that we do not specify the name as infoServlet.java as it is the java class file.

The <servlet-mapping > tag :-It is used to map the name by which the client will access the servlet to the deployment name. Here the <url-pattern> specifies the name by which the client accesses the servlet.

  • Deploying (Contd .....) : Copy the web.xml file and save it under the WEB-INF directory.

  • Now we would have to create the simple html form in which user will enter the details and when he clicks on the submit button the post request will be send to the server. The container will then invoke the servlet to do its operation and servlet will generate the response which will be converted to http repsonse by the container and send back to the client. Simple isn't it. The code for the form is given below, copy and paste the code and save it as form.html under the proj1 directory.
    &lt;html&gt;
    &lt;head&gt;
    &lt;title&gt; A temporary page &lt;/title&gt;
    &lt;/head&gt;
    &lt;body&gt;
    &lt;h1&gt;
    Fill up the following form
    &lt;/h1&gt;
    &lt;form id="2314" method="post" action="submit"&gt;
    &lt;center&gt;
    Enter your name &lt;input name="text_field" type="text" value=""/&gt;&lt;br/&gt;&lt;br/&gt;
    Enter your password &lt;input name="password_field" type="password" value="" /&gt; &lt;br/&gt;&lt;br/&gt;
    &lt;br/&gt;
    &lt;input type="submit" value="submit form"&gt;
    &lt;/center&gt;
    &lt;/form&gt;
    &lt;/body&gt;
    &lt;/html&gt;

    The html code is pretty simple and you should note only 2 things :-

    1. The form is using the post method so a post query is generated when the user clicks on the submit button.

    2. The input field name property is used by the servlet to access the parameter values entered by the user.

Running the servlet:-

Phew! everything is done now just the working of application is to be seen.
  • Start the apache tomcat service. Note in case you have problems launching it just go to its binary directory i.e the bin directory and launch it from there, it will be launched in a command prompt.
  • Open the browser and access the html form and type http://localhost:8080/proj1/form.html in your browser navigation bar.
  • Fill up the details and click on the submit button and voila! you will see the response generated by the servlet which will be the user-name and the date that you entered in the form.
Note:If you have any problems do post a comment and i will post the solution.

Posted on Sunday, June 28, 2009 by Unknown

To change cs 1.6 start-up or menu music, follow these simple steps:-

  • Open the directory where counter strike is installed and navigate to the cstrike directory.

    For non steam cs 1.6:-
    If you don't know where the installation directory is just right click on the shortcut, choose properties and then click on the find target button.

    For steam cs 1.6:-
    Right click on the steam shortcut, choose properties and then click on the find target button.
    Now navigate to under the cstrike folder by following this sequence:- SteamApps->"your steam id"->counter-strike ->cstrike.
  • Now under the cstrike directory, if there is a folder named media then open it else you should create the media folder.
  • In the media folder delete the gamestartup.mp3 file and replace it with a mp3 music file of your choice, then rename the music file to gamestartup.
  • Now Launch the game and listen to your favorite music in the game.


counter strike image

Posted on Sunday, June 28, 2009 by Unknown

Jun 27, 2009

The related posts widget is really helpful for your site because of the following reasons:-

  1. It attracts the attention of the user viewing your website to other articles filed under the similar category i.e the posts filed under the same label. So a user generally ends up viewing those articles and in effect stays at your site for longer period of time.

  2. It generates a lot of internal links from which a user might be able to find related information on your site and these internal links are good for SEO also.
To add the widget to your just follow these simple steps:-

  • Open the layout section of your blog and then go to the Edit Html Section.

  • Now add the following code just above the </head> tag. This code is added in the head section because style-sheets are generally defined in the head section.


    <style>
    #related-posts {
    float : left;
    width : 540px;
    margin-top:20px;
    margin-left : 5px;
    margin-bottom:20px;
    font : 12px Verdana;
    margin-bottom:10px;
    }
    #related-posts .widget {
    list-style-type : none;
    margin : 5px 0 5px 0;
    padding : 0;
    }
    #related-posts .widget h2, #related-posts h2 {
    color : #940f04;
    font-size : 20px;
    font-weight : normal;
    margin : 5px 7px 0;
    padding : 0 0 5px;
    }
    #related-posts a {
    color : #054474;
    font-size : 12px;
    text-decoration : none;
    }
    #related-posts a:hover {
    color : #054474;
    text-decoration : none;
    }
    #related-posts ul {
    border : medium none;
    margin : 10px;
    padding : 0;
    }
    #related-posts ul li {
    display : block;
    background : url("http://ramannanda9.fileave.com/0041_sparklet.png") no-repeat 0 0;
    margin : 0;
    padding-top : 0;
    padding-right : 0;
    padding-bottom : 1px;
    padding-left : 16px;
    margin-bottom : 5px;
    line-height : 2em;
    border-bottom:1px dotted #cccccc;
    }

    </style>
    <script src='http://ramannanda9.fileave.com/related_widgets.js' type='text/javascript'/>

  • Now click on the expand widget template and search for <data:post.body> and add the following code after the </p> tag.
    <b:if cond='data:blog.pageType == "item"'>
    <div id="related-posts">
    <font face='Arial' size='3'><b>Related Posts : </b></font><font color='#FFFFFF'><b:loop values='data:post.labels' var='label'><data:label.name/><b:if cond='data:label.isLast != "true"'>,</b:if><b:if cond='data:blog.pageType == "item"'>

    <script expr:src='"/feeds/posts/default/-/" + data:label.name + "?alt=json-in-script&callback=related_results_labels&max-results=5"' type='text/javascript'/></b:if></b:loop> </font>
    <script type='text/javascript'> removeRelatedDuplicates(); printRelatedLabels();
    </script>
    </div></b:if>

    Now you can customize the number of related posts that are displayed by changing the value of the variable max_results to any number you want (try to keep it small, 5 is the default value). Just use ctrl+f to find the variable max_results with ease. The data for related posts is read from your site feed.

    Now just click on save the template and you will have the working related posts widget for your blogger site.
You should not encounter any problems in case of install but in case you do, post a comment i will post the solution.

Posted on Saturday, June 27, 2009 by Unknown

Jun 23, 2009

This tutorial of Hlds server for counter strike 1.6 mainly concentrates upon the following aspects:-
  • Launching the hlds and its launch options.
  • Server rates for lag and choke free game-play.
This tutorial does not cover the configuration of modem/router as it has been already covered, visit this link for that.

1. Launching HLDS and it's launch options :- It can be launched in the following modes
  1. GUI mode
  2. Console mode
You should prefer launching the server from the console mode as it consumes less resources and runs smoothly.

To launch it in the console mode follow these steps:-
  • Create a shortcut of hlds on the desktop.
  • Right click on the shortcut, select properties , select shortcut tab and in the target field after the game path (the path b/w the quotes), copy and paste the following code.

    -console -game cstrike +sys_ticrate 1000 +heapsize 250000 +maxplayers 10 +map de_dust2

    In this you can change the value of maxplayers and the map to what you want.
  • Setting up the rcon_password: One must set the rcon_password as it allows the server admin privileged commands like kick ban etc and if you do not set the rcon_password then anyone can execute those commands. To set the password execute the command: rcon_password "any-password" where "any-password" is the password you want to use.
  • Increasing the process priority: Open the Windows task-manager, select the processes tab, select hlds.exe and right click on it and change its priority to realtime. This gives extra priority to the hlds process which reduces the lag.
  • Changing sv_lan:Change the parameter sv_lan to 0 from 1 in the server.cfg file in the cstrike directory for online game play else there is no need to change the value.
  • Adding Master server:One must add the master servers so that the server gets listed in the list, when people search for the game servers . For that add the following lines of code to your server.cfg file

    setmaster add 69.28.151.162 setmaster add 72.165.61.189 setmaster add 207.173.177.11 setmaster add 68.142.72.250 setmaster add 65.73.232.251:27040 setmaster add 65.73.232.253:27040 setmaster add 207.173.177.12:27010 setmaster add 207.173.177.11:27010

2. Server rates: These server rates are very important and must be set correctly for the lag and choke free game-play.

Follow these steps:-
  1. Insert into the server.cfg file, the following alias based scripts that you can use to change the server rates easily. To change the rate just type the corresponding alias. For example:- if you want to set the rate to "normal" just type normal in the console.
    alias "slow" "sv_minrate 6000;sv_maxrate 9000;sv_minupdaterate 14;sv_maxupdaterate 14;echo slow rate set" alias "normal" "sv_minrate 6000;sv_maxrate 13000;sv_minupdaterate 15;sv_maxupdaterate 20;echo normal rate set" alias "fast" "sv_minrate 10000;sv_maxrate 15000;sv_minupdaterate 20;sv_maxupdaterate 30;echo fast rate set" alias "veryfast" "sv_minrate 10000;sv_maxrate 20000;sv_minupdaterate 30;sv_maxupdaterate 90;echo very fast rate set"

  2. Now you should turn off the logging feature which enhances the performance of the server as it does not have to write log files. Enter these settings into your server.cfg file.

    log off sv_logbans 0 sv_logfile 0 sv_log_onefile 0 mp_logmessages 0 mp_logdetail 0 sv_unlag 1 sv_maxunlag .1 fps_max 500
  3. Now depending upon your connection speed, you should enter the corresponding rates to the server.cfg file.

    For 256kbps :-
    sv_rate 15000 sv_cmdrate 66 sv_cmdbackup 4 sv_updaterate sv_resend 3 mp_dlmax 256 mp_decals 100


    For 512kbps:-

    sv_rate 17000 sv_cmdrate 80 sv_cmdbackup 4 mp_updaterate 80 sv_resend 3 mp_dlmax 420 mp_decals 100
    For 1mbps or higher :-

    sv_rate 25000 sv_cmdrate 101 sv_cmdbackup 6 mp_updaterate 101 sv_resend 3 mp_dlmax 768 mp_decals 400

These settings should give the players playing on your hlds choke free and lag free game-play.


counter strike image

Posted on Tuesday, June 23, 2009 by Unknown

partprobe is a program that tells the operating system kernel about the partition table changes by requesting the operating system to re-read the partition table again so that you do not have to reboot for the changes to appear on the partition table. A reboot is what the system administrators just cannot do on the system running web server's so for them this command is of utmost importance.

The command and its option

partprobe [-d] [-s] [-h] [device]

-d : Don't update the partition table, it is what you normally don't intend to do when you change the partition tables

-s : for showing summary of the devices and their partitions

-h: To show summary of options

device: The hardware device /dev/hda , /dev/hdb etc


Posted on Tuesday, June 23, 2009 by Unknown

The netstat command displays the network connections that have been established, the port's which these connections are using, the routing table, the statistics related to an interface(eth0 etc) and statistics for a particular protocol(ipv4,ipv6,icmp). You can use it to see whether a trojan or a backdoor connection is established with your pc acting as a server to a client (remote pc).

The netstat command and its options are explained below:-

NETSTAT [-a] [-b] [-e] [-n] [-o] [-p proto] [-r] [-s] [-v] [interval]

The options:-

-a :It displays all the connections and listening ports(the server listens for a connection to be established).

-b : It displays the program(executable) that is used for establishing connection.

-e: It displays the packet statistics at ethernet level. One often uses it along with the -s option.

-n: It displays the addresses in the numerical form(ip addresses) rather than using their names.

-o: It displays the owning process id that is a process id of the process that is using the connection. The process id's obtained can be used to check whether the process is malicious or not. You can check it by using the tasklist command with /SVC switch or can use process monitor to do the same and then by comparing the PID of the output with the output of the tasklist command, you can see whether the process is a malware and if it is the case then you should immediately check your computer for trojans and backdoors and try and terminate the process manually.

-p protocol: It displays the connection's that are established for the protocol mentioned. The protocol can be IPV4,IPV6,TCP,UDP etc.

-r : It displays the routing table. A routing table shows the interfaces, active routes under which it shows the gateway, the destination address, the subnet mask etc.

-s :It displays the statistics that are listed for each protocol seperately

-v: It is used along with -b and shows the sequence of components (ie dll's) used to establish connection.

interval: It displays the statistics after the seconds specified by the interval.

Example usages:

1) netstat -b -v : It shows the sequence of components used to establish connection for the processes listed by b option.

2) netstat -e -s: It displays the total bytes that are sent or received and the per protocol statistics.

Posted on Tuesday, June 23, 2009 by Unknown

Jun 16, 2009

What is the File Extension JSON ?

JSON is a lightweight, language independent "data " interchange format. It was derived from ECMAScript programming language standard. The MIME content type for it is application/json.
The file extension for it is .json. JSON defines a small set of formatting or rules for portable or language independent representation of data. JSON can represent four primitive types namely string, number, boolean, null and it can also be used to represent two structured types namely objects and arrays.

An object is a name-value pair similar to the dictionary data type in python where the name is a string and value can be string, number, null or boolean, object or array.
For example
:- A car can be represented in an object representation as;-
"cars":{"model":"2006", "manufacturer":"Audi","price":"20000 USD"} .
An array on the other hand is an ordered collection of similar data items.

JSON was designed to be minimal, portable and as a subset of Javascript. The JSON text is encoded in Unicode and default encoding is UTF-8. The code for generating JSON text from the XML representaion is available for programming languages like java, python, php.

The File Extension JSON is readily recognized and the JSON data is easily consumed by a simple javascript based script because it does not have to do any additional parsing. The following code snippet shows how you can use it to represent data with utmost ease.


{
"customers" : {
"customer" : {
"@attributes" : {
"id" : "2314"
},
"name" : "Raman deep",
"phone" : "9967345612",
"purchases": "30000 USD"
"address" : {
"street" : "23/25 Rajouri garden",
"city" : "New Delhi",
"state" : "Delhi",
"zip_code" : "654321"
}
}
}
}


whereas its xml representation is shown below and as can be seen by comparing these two representations that the former one is easy to parse as it uses javascript object and array data types to represent data and hence is used more nowadays.


<customer>
<customer id="2314">
<name>Raman deep</name>
<phone>9967345612</phone>
<purchases>30000 USD <purchases>
<address>
<street>23/25 Rajouri Garden</street>
<city>New Delhi</city>
<state>Delhi</state>
<zipcode>654321</zipcode>
</address>
</contact>
</contacts>


I hope this tutorial was brief and concise representation of the File Extension JSON .

Posted on Tuesday, June 16, 2009 by Unknown

Jun 11, 2009

Safari 4 : "The fastest web browser"

The one thing that you expect from apple when they launch a new product is the "design and functionality" of the product and the safari 4 web browser is just one example of how much attention software developers at apple pay to it.

The safari 4 browser is the fastest browser as endorsed by apple. It has incorporated newest features that are yet to be found in other web browsers, which makes Safari 4 special. The features that really stand out are as mentioned below:-

  • "Cover Flow" history feature: The browser provides a cover flow history feature by which you can actually see the web pages that you visited in a cover flow view, so that you can recognize the page you want to visit again. This feature stands out of the lot as by using this feature it becomes much easier to visit a web site that you visited in the past because it is easier to visually remember the web site rather than remembering the url you visit.


  • The Revamped History search feature: We know that all browsers provide url based search feature that you can use to find the web site you visited but the only concern is that "it is difficult" to remember the url of the web page you visited. So to overcome this drawback Safari 4 employs a search strategy by which one can search "inside the content" of the page that you visited which can be coupled with the " Cover flow " feature to give tremendous results. As can be seen from the following snapshot the browser's history search feature, the search is also done in the content of the page also.


  • The browser also provides advanced caching scheme of the most visited web pages, which makes them load much faster. The most visited web pages are represented in a nice, well laid out, panoramic view.
  • Lightning fast speed: It gives you lightning fast speed compared to other browsers as the page load time is drastically reduced in safari-4. It has the so called "Nitro Java script Engine" that enhances speeds for the javascript based sites. I have tweaked my mozilla firefox for best performance and yet it comes nowhere near to the performance offered by it.

Following is the video of Craig Federighi showing of the aforementioned features of Safari 4 :-


So go ahead and download the safari browser for yourself and feel the difference in browsing experience.

Posted on Thursday, June 11, 2009 by Unknown

Jun 8, 2009

What is the use of pivot table ?

The pivot table provides support for a sequence of values for ex: In case you want to have sequential values from 1 to 100 . These sequential values are required and can be used in numerous cases. In pivot tables values are not inserted directly but they are inserted inside a support table which is then concatenated with itself to populate pivot tables.

How to create a pivot table ?

To create a pivot table and insert values into it, you would have to create 2 following tables:-

1) Pivot table 2) Temporary/Support table

1) Pivot table: It has a pretty simple structure. To create a pivot table in sql execute the following query

create table if not exists pivot (
c int,
primary key (c))

The primary key on c is taken so that no repetitive value are entered.

2) Support table:- The next step is to create a support/ temporary table which will be used to fill up the pivot table. To create a support table execute the following simple query.

create table if not exists temp (
ch char(1))

the field is taken as char so that it can be concatenated with itself easily. For ex: the character concatenation operation '1'+'1'= '11'.

Then we have to insert 10 values (0 through 9) into the temp table. So execute the following insert statements one at a time.

insert into temp values('0')
insert into temp values('1')
insert into temp values('2')
insert into temp values('3')
insert into temp values('4')
insert into temp values('5')
insert into temp values('6')
insert into temp values('7')
insert into temp values('8')
insert into temp values('9')


3. Inserting values into the pivot table:- Now using 10 rows of the temp table, to generate 100 rows of pivot table all you have to do is concatenate temp to itself 2 times. The concatenation operation was explained above.

Execute the following query, if you are using microsoft sql:-

Insert into pivot
select t1.ch+t2.ch
from temp t1, temp t2
Else if you are using mysql execute the following query:-

Insert into pivot
select concat(t1.ch,t2.ch)
from temp t1, temp t2
The query will produce elements from 0 through 99.

Example usage of pivot table:-

As a simple example you can use it to print ascii chart of the ascii characters from 48 through 96. In this case the query would be as shown in the following code box:-


select c ascii_code, char(c) ascii_value
from pivot
where c between 48 and 96

Posted on Monday, June 08, 2009 by Unknown

Jun 7, 2009

The problem that you might face when you install ubuntu is it's default window manager GNOME is quite heavy on resources and tends to be buggy (for my pc configuration at least) so to cope up with resource crunch you can shift to a light window manager like fluxbox, XFCE etc as they tend to provide better performance than GNOME or KDE but are a little un-user friendly.

To change the window manager follow these steps:-

1) Install MENU:- The precondition for changing to any new window manager is to install the program MENU that manages the application menus so that you can launch the applications without the need of Gnome or KDE launchers.

To install MENU
  • Open terminal i.e Application->Accesories->Terminal or press ALT+F2 and choose run in terminal

  • Then type the following command in the terminal :-

    sudo apt-get install menu
    you will be asked for your password, enter it and the package menu will be installed.
2) Install the window manager :- The next step is to install the window manager itself. I would be explaining about how to install the FLUXBOX window manager.

The fluxbox window manager provides tab options, styles menu from which you can change the theme and wallpapers, configuration menu for configuring window display (including transparency,icons etc), wsm (text browser) and by default comes with 4 workspaces that you can toggle between, more workspace windows can be added. The thing that i like about it is that it's very fast.

To install fluxbox execute the following command:-

sudo apt-get install fluxbox

3) Changing the window manager
:- Now all you have to do is logout from ubuntu and then from the options on the login screen choose select session, choose Fluxbox and choose the window manager for current session only so that you can try it out before choosing to make it default.

The following is the snapshot of fluxbox:-

Posted on Sunday, June 07, 2009 by Unknown

Jun 5, 2009

The installation is very easy just follow these steps:-

  1. Installing Wine :- the wine package helps run windows executables on linux like systems. You can get any package with ease by using a single command or you can use synaptic package manager. I'll explain the procedure by using the command line (it's very easy).

    • Open the terminal :- Go to Applications->Accessories->Terminal


    • Then type the following command :-

      sudo apt-get install wine

      Then you will be asked for your password , enter it and press y when asked whether you want to install the package or not

    • Then type exit at the prompt to exit the terminal.


  2. Installing uTorrent : Download the uTorrent package for windows-xp and after it is downloaded, right click on it and choose open with "wine windows program loader" and after that you can choose the location of install (let it be default) , this will complete the installation of uTorrent.


  3. Launch the program : Now you can run the uTorrent program on ubuntu.

Note: If you have a dual boot os (windows-xp+ubuntu) then you should download torrent files using ubuntu which i feel utilises the maximum bandwidth available to you. Also if you receive a virus instead of the original intended file you will have no risk of it affecting your pc as linux based systems are generally virus safe and you can then transfer it to windows -xp by mounting it's partition on ubuntu.

Posted on Friday, June 05, 2009 by Unknown

May 31, 2009

This collection is made from deviant art's some of the most beautiful wallpapers, you can download some of these from below by clicking on the wallpaper image and opening them in a new tab and other wallpapers come in a pack so they can be downloaded in a rar archive format:-


1. Ultra Beam by Yethzart:-


2. High Definition Nature wallpaper by CurtiXs:- This a high definition wallpaper representing nature's pulchritude.


3. Music wallpaper By Zababuga:- This one is a naive looking wallpaper for music lovers.


4. Dandelion Wallpaper for Vista by kamekai :- A great looking wallpaper for windows vista.


5. One of the Wallpaper's from Artspace's 2009 collection:- This one is a eclectic mixture of light and dark colors.


6. Lamborghini wallpaper by Lil Milan :- This one is for people who are fanatic about car wallpaper's and obviously Lamborghini


7. Four Extreme wallpaper's by Bartoszf:- A tribute to music lovers as this wallpaper represents one of the finest musical instrument . I am showing here only one sample but it is available in four background colors and you can download all of them by clicking on the download link (image)


8. Water drop wallpaper by JK89:- This represents the pulchritude of a water droplet on the leaves. This comes in four resolutions and can be downloaded in a rar archive format by clicking on the download link ( download image).


9. Fire wallpaper's by rubina :- This wallpaper comes in three resolutions (1280*800, 1440*900, 1680*1050) and can be downloaded in a rar archive format by clicking on the download link (download image).


10. Vulcan's fury collection by Exntrik :- This is a collection of wallpaper's representing the fury of vulcan where Vulcan is considred to be the god of beneficial and hindering fire. The collection unlike others contains different wallpapers. I am showing here only one sample but there are three different wallpaper's in different resolution's and you can download all of them by clicking on the download link (image).


Posted on Sunday, May 31, 2009 by Unknown