Jun 28, 2009

What is a servlet ?

Servlet:a short introduction:-
A servlet handles the requests from the server, that require servlet to add something or do some operations in response to the client request so that a dynamic page can be generated, rather than the same old monotonous static html pages.

The servlet API's are generally provided along with Containers like tomcat, JBoss etc and you have to import the servlet-api.jar for compiling your servlet .java files. A java servlet does not have a main method so it is the container that controls the execution of servlet methods. The container initializes the servlet by calling it's init method, after which it's service method is called which determines that which of the servlet's method is to be called depending upon the client request and after a servlet's job is done it purges it's resources by calling it's destroy method.
The container also provides support for JSP.

The servlet class that you will implement let it's name be MyServlet , will generally extend the HttpServlet class that extends the GenericServlet class so the class hierarchy will be as shown in the following figure.
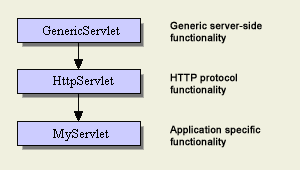


The servlet class that you will implement will most likely implement either of the following two methods:-

  1. public void doGet(HttpServletRequest request,HttpServletResponse response) throws IOException{ //code here}:-

    If the client uses the http Get query, then this will be the method that will be invoked by the container to handle the Get request. It takes reference to two objects HttpServletRequest and HttpServletResponse object, these objects are created by the container and their reference is passed to this method. A client will use a Get http request, If the amount of data to be sent is less, the data sent using get request is visible in the browser navigation bar, so you would not want to display sensitive information like user password, for that you will want to use the Http Post request .

  2. public void doPost(HttpServletRequest request,HttpServletResponse response) throws IOException{ // code here }

    If the client uses the http post request then this will be the method called by the container by looking at the client request. It is used when the amount of data to be sent is more, like filling up the html form and sending it to the server to process it and also when sensitive information like user password is to sent.
An example servlet :-

The example servlet(infoServlet) will be the most basic servlet, It will take the parameter user-name and password, perform some fake authentication (authentication won't actually be done) and display a welcome message to the user along with the current date and time.

The servlet code is given below and the explanation follows:-
import javax.servlet.*;
import javax.servlet.http.*;
import java.io.*;
public class infoServlet extends HttpServlet{
public void doPost(HttpServletRequest request, HttpServletResponse response)throws IOException,ServletException
{response.setContentType("text/html");
PrintWriter output=response.getWriter();
String name=request.getParameter("text_field");
String password=request.getParameter("password_field");
Date now = new Date();
//No authentication will be done
output.println("<html>"+"<head>"+"<title>"+
"Welcome page"+"</title>"+"</head>"+
"<body>"+"Welcome "+name+"<br/>"+
"The time is"+now+"</body>"+"</html>");
}

In this servlet we have implemented the doPost method as the client will be sending the sensitive information in a post request.

The method setContentType("content_type"); tells about the response mime type to the client browser so that it can display the page received properly.
Then we obtain a printwriter object reference by invoking the getWriter() method on the response object, which is used to generate the dynamic response page for the client.

The getParameter("field_name") gets the parameter value entered by the user in the form.

Now save the java file as infoServlet.java .

Compiling the servlet:-

To compile the servlet follow these steps:-
  • Open the command prompt and navigate to the directory where the infoServlet java file is saved.
  • Now to compile the servlet execute the following command.
    javac -classpath "C:/Program files/Tomcat6.0/lib/servlet_api.jar" infoServlet.java

    Here replace the classpath (the path between the quotes) with the path to your servlet_api.jar file provided by the container that you are using.
Deploying the servlet:-

I am here using the tomcat container, the deploying part may vary depending upon the container that you use.
  • Create a directory under the tomcat6.0/webapps directory, name it proj1 then under the proj1 directory create a directory WEB-INF , then create a directory classes under the WEB-INF directory.
  • Copy the generated class file into the classes directory.
Deployment Descriptor (DD):-

Now you would have to create the deployment descriptor ie the web.xml file that tells the container about information such as where the servlet class file is placed, what is the deployment name that you are using, what will be the name by which client will call the servlet and obviously various other parameters.

The deployment descriptor is given in the following code-box, copy the contents and save it as web.xml
<?xml version="1.0"?>
<web-app xmlns="http://java.sun.com/xml/ns/javaee"
xmlns:xsi="http://www.w3.org/2001/XMLSchema-instance"
xsi:schemaLocation="http://java.sun.com/xml/ns/javaee
http://java.sun.com/xml/ns/javaee/web-app_2_5.xsd"
version="2.5">
<servlet>
<servlet-name>TestServlet</servlet-name>
<servlet-class>infoServlet</servlet-class>
</servlet>
<servlet-mapping>
<servlet-name>TestServlet</servlet-name>
<url-pattern>/submit</url-pattern>
</servlet-mapping>
</web-app>

Explanation:-

One should not worry about the webapp tag just copy and paste it.

The <servlet> tag:- It defines the properties relating to your servlet. In this case we map the deployment name ie the name specified by <servlet-name> tag , to the path to actual class file i.e the name specified by the <servlet-class&gt tag; i.e the infoservlet, notice here that we do not specify the name as infoServlet.java as it is the java class file.

The <servlet-mapping > tag :-It is used to map the name by which the client will access the servlet to the deployment name. Here the <url-pattern> specifies the name by which the client accesses the servlet.

  • Deploying (Contd .....) : Copy the web.xml file and save it under the WEB-INF directory.

  • Now we would have to create the simple html form in which user will enter the details and when he clicks on the submit button the post request will be send to the server. The container will then invoke the servlet to do its operation and servlet will generate the response which will be converted to http repsonse by the container and send back to the client. Simple isn't it. The code for the form is given below, copy and paste the code and save it as form.html under the proj1 directory.
    &lt;html&gt;
    &lt;head&gt;
    &lt;title&gt; A temporary page &lt;/title&gt;
    &lt;/head&gt;
    &lt;body&gt;
    &lt;h1&gt;
    Fill up the following form
    &lt;/h1&gt;
    &lt;form id="2314" method="post" action="submit"&gt;
    &lt;center&gt;
    Enter your name &lt;input name="text_field" type="text" value=""/&gt;&lt;br/&gt;&lt;br/&gt;
    Enter your password &lt;input name="password_field" type="password" value="" /&gt; &lt;br/&gt;&lt;br/&gt;
    &lt;br/&gt;
    &lt;input type="submit" value="submit form"&gt;
    &lt;/center&gt;
    &lt;/form&gt;
    &lt;/body&gt;
    &lt;/html&gt;

    The html code is pretty simple and you should note only 2 things :-

    1. The form is using the post method so a post query is generated when the user clicks on the submit button.

    2. The input field name property is used by the servlet to access the parameter values entered by the user.

Running the servlet:-

Phew! everything is done now just the working of application is to be seen.
  • Start the apache tomcat service. Note in case you have problems launching it just go to its binary directory i.e the bin directory and launch it from there, it will be launched in a command prompt.
  • Open the browser and access the html form and type http://localhost:8080/proj1/form.html in your browser navigation bar.
  • Fill up the details and click on the submit button and voila! you will see the response generated by the servlet which will be the user-name and the date that you entered in the form.
Note:If you have any problems do post a comment and i will post the solution.

Posted on Sunday, June 28, 2009 by Unknown

To change cs 1.6 start-up or menu music, follow these simple steps:-

  • Open the directory where counter strike is installed and navigate to the cstrike directory.

    For non steam cs 1.6:-
    If you don't know where the installation directory is just right click on the shortcut, choose properties and then click on the find target button.

    For steam cs 1.6:-
    Right click on the steam shortcut, choose properties and then click on the find target button.
    Now navigate to under the cstrike folder by following this sequence:- SteamApps->"your steam id"->counter-strike ->cstrike.
  • Now under the cstrike directory, if there is a folder named media then open it else you should create the media folder.
  • In the media folder delete the gamestartup.mp3 file and replace it with a mp3 music file of your choice, then rename the music file to gamestartup.
  • Now Launch the game and listen to your favorite music in the game.


counter strike image

Posted on Sunday, June 28, 2009 by Unknown

Jun 27, 2009

The related posts widget is really helpful for your site because of the following reasons:-

  1. It attracts the attention of the user viewing your website to other articles filed under the similar category i.e the posts filed under the same label. So a user generally ends up viewing those articles and in effect stays at your site for longer period of time.

  2. It generates a lot of internal links from which a user might be able to find related information on your site and these internal links are good for SEO also.
To add the widget to your just follow these simple steps:-

  • Open the layout section of your blog and then go to the Edit Html Section.

  • Now add the following code just above the </head> tag. This code is added in the head section because style-sheets are generally defined in the head section.


    <style>
    #related-posts {
    float : left;
    width : 540px;
    margin-top:20px;
    margin-left : 5px;
    margin-bottom:20px;
    font : 12px Verdana;
    margin-bottom:10px;
    }
    #related-posts .widget {
    list-style-type : none;
    margin : 5px 0 5px 0;
    padding : 0;
    }
    #related-posts .widget h2, #related-posts h2 {
    color : #940f04;
    font-size : 20px;
    font-weight : normal;
    margin : 5px 7px 0;
    padding : 0 0 5px;
    }
    #related-posts a {
    color : #054474;
    font-size : 12px;
    text-decoration : none;
    }
    #related-posts a:hover {
    color : #054474;
    text-decoration : none;
    }
    #related-posts ul {
    border : medium none;
    margin : 10px;
    padding : 0;
    }
    #related-posts ul li {
    display : block;
    background : url("http://ramannanda9.fileave.com/0041_sparklet.png") no-repeat 0 0;
    margin : 0;
    padding-top : 0;
    padding-right : 0;
    padding-bottom : 1px;
    padding-left : 16px;
    margin-bottom : 5px;
    line-height : 2em;
    border-bottom:1px dotted #cccccc;
    }

    </style>
    <script src='http://ramannanda9.fileave.com/related_widgets.js' type='text/javascript'/>

  • Now click on the expand widget template and search for <data:post.body> and add the following code after the </p> tag.
    <b:if cond='data:blog.pageType == "item"'>
    <div id="related-posts">
    <font face='Arial' size='3'><b>Related Posts : </b></font><font color='#FFFFFF'><b:loop values='data:post.labels' var='label'><data:label.name/><b:if cond='data:label.isLast != "true"'>,</b:if><b:if cond='data:blog.pageType == "item"'>

    <script expr:src='"/feeds/posts/default/-/" + data:label.name + "?alt=json-in-script&callback=related_results_labels&max-results=5"' type='text/javascript'/></b:if></b:loop> </font>
    <script type='text/javascript'> removeRelatedDuplicates(); printRelatedLabels();
    </script>
    </div></b:if>

    Now you can customize the number of related posts that are displayed by changing the value of the variable max_results to any number you want (try to keep it small, 5 is the default value). Just use ctrl+f to find the variable max_results with ease. The data for related posts is read from your site feed.

    Now just click on save the template and you will have the working related posts widget for your blogger site.
You should not encounter any problems in case of install but in case you do, post a comment i will post the solution.

Posted on Saturday, June 27, 2009 by Unknown

Jun 23, 2009

This tutorial of Hlds server for counter strike 1.6 mainly concentrates upon the following aspects:-
  • Launching the hlds and its launch options.
  • Server rates for lag and choke free game-play.
This tutorial does not cover the configuration of modem/router as it has been already covered, visit this link for that.

1. Launching HLDS and it's launch options :- It can be launched in the following modes
  1. GUI mode
  2. Console mode
You should prefer launching the server from the console mode as it consumes less resources and runs smoothly.

To launch it in the console mode follow these steps:-
  • Create a shortcut of hlds on the desktop.
  • Right click on the shortcut, select properties , select shortcut tab and in the target field after the game path (the path b/w the quotes), copy and paste the following code.

    -console -game cstrike +sys_ticrate 1000 +heapsize 250000 +maxplayers 10 +map de_dust2

    In this you can change the value of maxplayers and the map to what you want.
  • Setting up the rcon_password: One must set the rcon_password as it allows the server admin privileged commands like kick ban etc and if you do not set the rcon_password then anyone can execute those commands. To set the password execute the command: rcon_password "any-password" where "any-password" is the password you want to use.
  • Increasing the process priority: Open the Windows task-manager, select the processes tab, select hlds.exe and right click on it and change its priority to realtime. This gives extra priority to the hlds process which reduces the lag.
  • Changing sv_lan:Change the parameter sv_lan to 0 from 1 in the server.cfg file in the cstrike directory for online game play else there is no need to change the value.
  • Adding Master server:One must add the master servers so that the server gets listed in the list, when people search for the game servers . For that add the following lines of code to your server.cfg file

    setmaster add 69.28.151.162 setmaster add 72.165.61.189 setmaster add 207.173.177.11 setmaster add 68.142.72.250 setmaster add 65.73.232.251:27040 setmaster add 65.73.232.253:27040 setmaster add 207.173.177.12:27010 setmaster add 207.173.177.11:27010

2. Server rates: These server rates are very important and must be set correctly for the lag and choke free game-play.

Follow these steps:-
  1. Insert into the server.cfg file, the following alias based scripts that you can use to change the server rates easily. To change the rate just type the corresponding alias. For example:- if you want to set the rate to "normal" just type normal in the console.
    alias "slow" "sv_minrate 6000;sv_maxrate 9000;sv_minupdaterate 14;sv_maxupdaterate 14;echo slow rate set" alias "normal" "sv_minrate 6000;sv_maxrate 13000;sv_minupdaterate 15;sv_maxupdaterate 20;echo normal rate set" alias "fast" "sv_minrate 10000;sv_maxrate 15000;sv_minupdaterate 20;sv_maxupdaterate 30;echo fast rate set" alias "veryfast" "sv_minrate 10000;sv_maxrate 20000;sv_minupdaterate 30;sv_maxupdaterate 90;echo very fast rate set"

  2. Now you should turn off the logging feature which enhances the performance of the server as it does not have to write log files. Enter these settings into your server.cfg file.

    log off sv_logbans 0 sv_logfile 0 sv_log_onefile 0 mp_logmessages 0 mp_logdetail 0 sv_unlag 1 sv_maxunlag .1 fps_max 500
  3. Now depending upon your connection speed, you should enter the corresponding rates to the server.cfg file.

    For 256kbps :-
    sv_rate 15000 sv_cmdrate 66 sv_cmdbackup 4 sv_updaterate sv_resend 3 mp_dlmax 256 mp_decals 100


    For 512kbps:-

    sv_rate 17000 sv_cmdrate 80 sv_cmdbackup 4 mp_updaterate 80 sv_resend 3 mp_dlmax 420 mp_decals 100
    For 1mbps or higher :-

    sv_rate 25000 sv_cmdrate 101 sv_cmdbackup 6 mp_updaterate 101 sv_resend 3 mp_dlmax 768 mp_decals 400

These settings should give the players playing on your hlds choke free and lag free game-play.


counter strike image

Posted on Tuesday, June 23, 2009 by Unknown

partprobe is a program that tells the operating system kernel about the partition table changes by requesting the operating system to re-read the partition table again so that you do not have to reboot for the changes to appear on the partition table. A reboot is what the system administrators just cannot do on the system running web server's so for them this command is of utmost importance.

The command and its option

partprobe [-d] [-s] [-h] [device]

-d : Don't update the partition table, it is what you normally don't intend to do when you change the partition tables

-s : for showing summary of the devices and their partitions

-h: To show summary of options

device: The hardware device /dev/hda , /dev/hdb etc


Posted on Tuesday, June 23, 2009 by Unknown

The netstat command displays the network connections that have been established, the port's which these connections are using, the routing table, the statistics related to an interface(eth0 etc) and statistics for a particular protocol(ipv4,ipv6,icmp). You can use it to see whether a trojan or a backdoor connection is established with your pc acting as a server to a client (remote pc).

The netstat command and its options are explained below:-

NETSTAT [-a] [-b] [-e] [-n] [-o] [-p proto] [-r] [-s] [-v] [interval]

The options:-

-a :It displays all the connections and listening ports(the server listens for a connection to be established).

-b : It displays the program(executable) that is used for establishing connection.

-e: It displays the packet statistics at ethernet level. One often uses it along with the -s option.

-n: It displays the addresses in the numerical form(ip addresses) rather than using their names.

-o: It displays the owning process id that is a process id of the process that is using the connection. The process id's obtained can be used to check whether the process is malicious or not. You can check it by using the tasklist command with /SVC switch or can use process monitor to do the same and then by comparing the PID of the output with the output of the tasklist command, you can see whether the process is a malware and if it is the case then you should immediately check your computer for trojans and backdoors and try and terminate the process manually.

-p protocol: It displays the connection's that are established for the protocol mentioned. The protocol can be IPV4,IPV6,TCP,UDP etc.

-r : It displays the routing table. A routing table shows the interfaces, active routes under which it shows the gateway, the destination address, the subnet mask etc.

-s :It displays the statistics that are listed for each protocol seperately

-v: It is used along with -b and shows the sequence of components (ie dll's) used to establish connection.

interval: It displays the statistics after the seconds specified by the interval.

Example usages:

1) netstat -b -v : It shows the sequence of components used to establish connection for the processes listed by b option.

2) netstat -e -s: It displays the total bytes that are sent or received and the per protocol statistics.

Posted on Tuesday, June 23, 2009 by Unknown

Jun 16, 2009

What is the File Extension JSON ?

JSON is a lightweight, language independent "data " interchange format. It was derived from ECMAScript programming language standard. The MIME content type for it is application/json.
The file extension for it is .json. JSON defines a small set of formatting or rules for portable or language independent representation of data. JSON can represent four primitive types namely string, number, boolean, null and it can also be used to represent two structured types namely objects and arrays.

An object is a name-value pair similar to the dictionary data type in python where the name is a string and value can be string, number, null or boolean, object or array.
For example
:- A car can be represented in an object representation as;-
"cars":{"model":"2006", "manufacturer":"Audi","price":"20000 USD"} .
An array on the other hand is an ordered collection of similar data items.

JSON was designed to be minimal, portable and as a subset of Javascript. The JSON text is encoded in Unicode and default encoding is UTF-8. The code for generating JSON text from the XML representaion is available for programming languages like java, python, php.

The File Extension JSON is readily recognized and the JSON data is easily consumed by a simple javascript based script because it does not have to do any additional parsing. The following code snippet shows how you can use it to represent data with utmost ease.


{
"customers" : {
"customer" : {
"@attributes" : {
"id" : "2314"
},
"name" : "Raman deep",
"phone" : "9967345612",
"purchases": "30000 USD"
"address" : {
"street" : "23/25 Rajouri garden",
"city" : "New Delhi",
"state" : "Delhi",
"zip_code" : "654321"
}
}
}
}


whereas its xml representation is shown below and as can be seen by comparing these two representations that the former one is easy to parse as it uses javascript object and array data types to represent data and hence is used more nowadays.


<customer>
<customer id="2314">
<name>Raman deep</name>
<phone>9967345612</phone>
<purchases>30000 USD <purchases>
<address>
<street>23/25 Rajouri Garden</street>
<city>New Delhi</city>
<state>Delhi</state>
<zipcode>654321</zipcode>
</address>
</contact>
</contacts>


I hope this tutorial was brief and concise representation of the File Extension JSON .

Posted on Tuesday, June 16, 2009 by Unknown

Jun 11, 2009

Safari 4 : "The fastest web browser"

The one thing that you expect from apple when they launch a new product is the "design and functionality" of the product and the safari 4 web browser is just one example of how much attention software developers at apple pay to it.

The safari 4 browser is the fastest browser as endorsed by apple. It has incorporated newest features that are yet to be found in other web browsers, which makes Safari 4 special. The features that really stand out are as mentioned below:-

  • "Cover Flow" history feature: The browser provides a cover flow history feature by which you can actually see the web pages that you visited in a cover flow view, so that you can recognize the page you want to visit again. This feature stands out of the lot as by using this feature it becomes much easier to visit a web site that you visited in the past because it is easier to visually remember the web site rather than remembering the url you visit.


  • The Revamped History search feature: We know that all browsers provide url based search feature that you can use to find the web site you visited but the only concern is that "it is difficult" to remember the url of the web page you visited. So to overcome this drawback Safari 4 employs a search strategy by which one can search "inside the content" of the page that you visited which can be coupled with the " Cover flow " feature to give tremendous results. As can be seen from the following snapshot the browser's history search feature, the search is also done in the content of the page also.


  • The browser also provides advanced caching scheme of the most visited web pages, which makes them load much faster. The most visited web pages are represented in a nice, well laid out, panoramic view.
  • Lightning fast speed: It gives you lightning fast speed compared to other browsers as the page load time is drastically reduced in safari-4. It has the so called "Nitro Java script Engine" that enhances speeds for the javascript based sites. I have tweaked my mozilla firefox for best performance and yet it comes nowhere near to the performance offered by it.

Following is the video of Craig Federighi showing of the aforementioned features of Safari 4 :-


So go ahead and download the safari browser for yourself and feel the difference in browsing experience.

Posted on Thursday, June 11, 2009 by Unknown

Jun 8, 2009

What is the use of pivot table ?

The pivot table provides support for a sequence of values for ex: In case you want to have sequential values from 1 to 100 . These sequential values are required and can be used in numerous cases. In pivot tables values are not inserted directly but they are inserted inside a support table which is then concatenated with itself to populate pivot tables.

How to create a pivot table ?

To create a pivot table and insert values into it, you would have to create 2 following tables:-

1) Pivot table 2) Temporary/Support table

1) Pivot table: It has a pretty simple structure. To create a pivot table in sql execute the following query

create table if not exists pivot (
c int,
primary key (c))

The primary key on c is taken so that no repetitive value are entered.

2) Support table:- The next step is to create a support/ temporary table which will be used to fill up the pivot table. To create a support table execute the following simple query.

create table if not exists temp (
ch char(1))

the field is taken as char so that it can be concatenated with itself easily. For ex: the character concatenation operation '1'+'1'= '11'.

Then we have to insert 10 values (0 through 9) into the temp table. So execute the following insert statements one at a time.

insert into temp values('0')
insert into temp values('1')
insert into temp values('2')
insert into temp values('3')
insert into temp values('4')
insert into temp values('5')
insert into temp values('6')
insert into temp values('7')
insert into temp values('8')
insert into temp values('9')


3. Inserting values into the pivot table:- Now using 10 rows of the temp table, to generate 100 rows of pivot table all you have to do is concatenate temp to itself 2 times. The concatenation operation was explained above.

Execute the following query, if you are using microsoft sql:-

Insert into pivot
select t1.ch+t2.ch
from temp t1, temp t2
Else if you are using mysql execute the following query:-

Insert into pivot
select concat(t1.ch,t2.ch)
from temp t1, temp t2
The query will produce elements from 0 through 99.

Example usage of pivot table:-

As a simple example you can use it to print ascii chart of the ascii characters from 48 through 96. In this case the query would be as shown in the following code box:-


select c ascii_code, char(c) ascii_value
from pivot
where c between 48 and 96

Posted on Monday, June 08, 2009 by Unknown

Jun 7, 2009

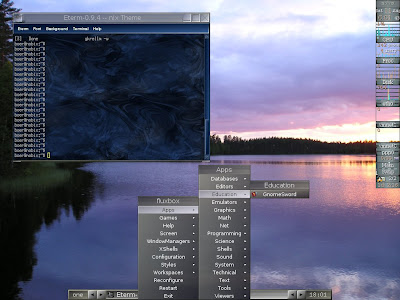
The problem that you might face when you install ubuntu is it's default window manager GNOME is quite heavy on resources and tends to be buggy (for my pc configuration at least) so to cope up with resource crunch you can shift to a light window manager like fluxbox, XFCE etc as they tend to provide better performance than GNOME or KDE but are a little un-user friendly.

To change the window manager follow these steps:-

1) Install MENU:- The precondition for changing to any new window manager is to install the program MENU that manages the application menus so that you can launch the applications without the need of Gnome or KDE launchers.

To install MENU
  • Open terminal i.e Application->Accesories->Terminal or press ALT+F2 and choose run in terminal

  • Then type the following command in the terminal :-

    sudo apt-get install menu
    you will be asked for your password, enter it and the package menu will be installed.
2) Install the window manager :- The next step is to install the window manager itself. I would be explaining about how to install the FLUXBOX window manager.

The fluxbox window manager provides tab options, styles menu from which you can change the theme and wallpapers, configuration menu for configuring window display (including transparency,icons etc), wsm (text browser) and by default comes with 4 workspaces that you can toggle between, more workspace windows can be added. The thing that i like about it is that it's very fast.

To install fluxbox execute the following command:-

sudo apt-get install fluxbox

3) Changing the window manager
:- Now all you have to do is logout from ubuntu and then from the options on the login screen choose select session, choose Fluxbox and choose the window manager for current session only so that you can try it out before choosing to make it default.

The following is the snapshot of fluxbox:-

Posted on Sunday, June 07, 2009 by Unknown

Jun 5, 2009

The installation is very easy just follow these steps:-

  1. Installing Wine :- the wine package helps run windows executables on linux like systems. You can get any package with ease by using a single command or you can use synaptic package manager. I'll explain the procedure by using the command line (it's very easy).

    • Open the terminal :- Go to Applications->Accessories->Terminal


    • Then type the following command :-

      sudo apt-get install wine

      Then you will be asked for your password , enter it and press y when asked whether you want to install the package or not

    • Then type exit at the prompt to exit the terminal.


  2. Installing uTorrent : Download the uTorrent package for windows-xp and after it is downloaded, right click on it and choose open with "wine windows program loader" and after that you can choose the location of install (let it be default) , this will complete the installation of uTorrent.


  3. Launch the program : Now you can run the uTorrent program on ubuntu.

Note: If you have a dual boot os (windows-xp+ubuntu) then you should download torrent files using ubuntu which i feel utilises the maximum bandwidth available to you. Also if you receive a virus instead of the original intended file you will have no risk of it affecting your pc as linux based systems are generally virus safe and you can then transfer it to windows -xp by mounting it's partition on ubuntu.

Posted on Friday, June 05, 2009 by Unknown