Aug 5, 2015

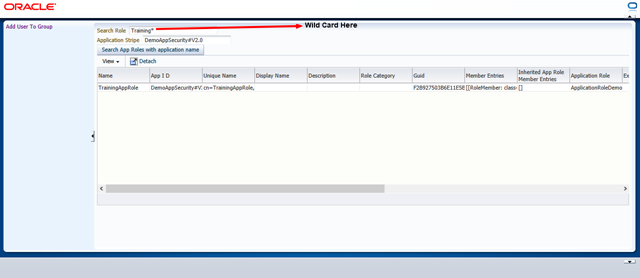
Earlier, I had covered an example here, which showed how to dynamically create users and map the application roles to enterprise groups. In this post, the sample application is extended to show how you can query the application roles from the application stripe(application specific policies).
To query the application specific roles, you need to access the application's policy from policystore and then you can either directly invoke searchRoles(String roleName) or searchRoles(String attributeToSearchRolesBy,String attributeValue,String equalityOrInequalityFlag). The response from the method is a List<AppRoleEntry>. The snippet below shows the code for doing so. Note that although there is another much more flexible method to search across application stripes by using policyStore.getAppRoles(StoreAppRoleSearchQuery obj), It is not implemented for the embedded policy store and throws UnsupportedOperationException.
    /**
     * Given a application stripe name and rolename this can be used to search for a role name
     * This method performs a wildcard search also.
     * @param roleName the rolename to search
     * @param applicationStripeName the application stripe name 
     */
    public List<AppRoleEntry> searchAppRoleInApplicationStripe(String roleName,
                                                               String applicationStripeName) {
        JpsContext ctxt = IdentityStoreConfigurator.jpsCtxt;

        PolicyStore ps = ctxt.getServiceInstance(PolicyStore.class);
        ApplicationPolicy policy;

        try {
            policy = ps.getApplicationPolicy(applicationStripeName);
            return policy.searchAppRoles(ApplicationRoleAttributes.NAME.toString(),roleName,false );
           

        } catch (PolicyStoreException e) {
            throw new RuntimeException(e);
        } 
       
    }

......


    private static final class IdentityStoreConfigurator {
        private static final JpsContext jpsCtxt = initializeFactory();


        private static JpsContext initializeFactory() {
            String methodName =
                Thread.currentThread().getStackTrace()[1].getMethodName();
            JpsContextFactory tempFactory;
            JpsContext jpsContext;
            try {
                tempFactory = JpsContextFactory.getContextFactory();
                jpsContext = tempFactory.getContext();
            } catch (JpsException e) {
                DemoJpsLogger.severe("Exception in " + methodName + " " +
                                     e.getMessage() + " ", e);
                throw new RuntimeException("Exception in " + methodName + " " +
                                           e.getMessage() + " ", e);
            }
            return jpsContext;
        }


    }
....


You can also do various other operations on the policy store and alter the application specific policies, once you have access to those operations. A key thing to note is these operations require specific PolicyStoreAccessPermissions to be granted in the jazn-data.xml. The steps to do so are mentioned below.


  1. Define a resource type of permission class PolicyStoreAccessPermission and the neccessary actions that you want to grant access to (In this example,I am granting access to all operations, signified by *). The snippet is shown below:-


    <resource-type>
      <name>PolicyStorePermission</name>
      <matcher-class>oracle.security.jps.service.policystore.PolicyStoreAccessPermission</matcher-class>
      <actions>*</actions>
    </resource-type>


  2. Next, create resources that are to be granted permissions. In this case, I have created two of them, the first one is the superset that allows access to all the application stripes and the next one grants access to only this applications's stripe. The snippet is shown below:-


    <resources>
     <resource>
            <name>context=APPLICATION, name=*</name>
            <type-name-ref>PolicyStorePermission</type-name-ref>
          </resource>
        
          <resource>
            <name>context=APPLICATION,name=DemoAppSecurity#V2.0</name>
            <type-name-ref>PolicyStorePermission</type-name-ref>
          </resource>
    </resources>


  3. In the last step you have to assign these resources to the application roles or groups.
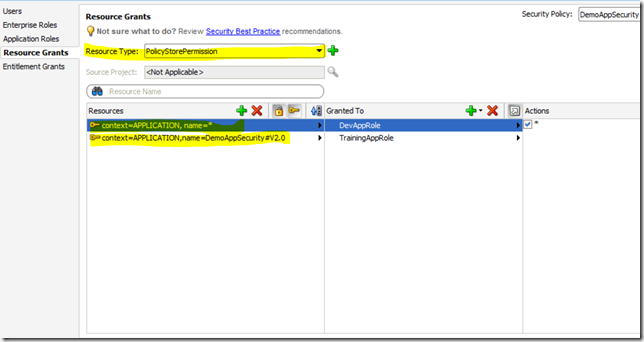


custom_permission application_stripe_search

The enterprise identity store provider being used here is the embedded weblogic ldap, to run the application properly you will need to configure a password for it in weblogic and set the password in jps-config.xml as shown in the screenshot below.

image_jps_emb_ldap


To run the application, the username/password combination is john/oracle123. To view the search roles screen, either run the SearchRoles.jspx or click on the Search Roles link in the left navigation bar. The link to download the application is mentioned below:-

Download the application.

Posted on Wednesday, August 05, 2015 by Unknown

Jun 11, 2015

You might be aware that there are different content encoding formats for encoding the text. Generally, it is safe to use UTF encoding, but at least you would expect that the websites would specify the encoding format in the response. Alas, you might find certain sites , which just send the content without specifying the content encoding that they are using. So to detect content encoding for such cases, you need a FSM (Finite State Machine). Initially, you just split the input into individual characters and then pass them onto different state machines, each of which uses a different encoding scheme.  For each character that is passed to the state machine, it can either immediately identify a character that is unique to its encoding format, continue, or error out.  At, the end of operation, you would generally expect a specific content encoding format or if insufficient input is available, return the default encoding format.  You can read more about this here Universal Charset Detection. 

Mozilla already has a library for this and there is a java port available for it. Mozilla’s library for this is universalchardet and the java port is juniversalchardet.

It’s really simple to use this as can be seen below:-

public static String detectCharset(InputStream is) throws IOException {

UniversalDetector detector = new UniversalDetector(null);

String encoding=null;

byte[] buf = new byte[1000];
// (2)
int nread;
while ((nread = is.read(buf)) > 0 && !detector.isDone()) {
detector.handleData(buf, 0, nread);
}
// (3)
detector.dataEnd();

// (4)
encoding = detector.getDetectedCharset();
if (encoding != null) {
logger.info("Detected encoding = " + encoding);
} else {
encoding = "ISO-8859-1";
logger.info("No encoding detected.");
}

// (5)
detector.reset();
return encoding;

}


This can be really useful, if you are planning to create a full text parser and the websites don’t return the content encoding that they are using.  I used this while designing the full text parser for my application.


Hope this is useful for others out there.

Posted on Thursday, June 11, 2015 by Unknown

Apr 10, 2015

In this post I will share an example of analyzing memory leak in an Android application. I recently tried to integrate a popular android library ShowcaseView which can be used for first run demos in your android application. The thing is while testing the library, I noticed severe memory leaks. This was occurring because references to ShowcaseView class were being kept. And, as bitmaps are created internally by this class to overlay the content, so each instance was holding a large chunk of memory.

Analyzing the issue 

For heap analysis, I used VisualVM. First, thing you need to realize is that the heap dump taken from android cannot be directly analyzed with VisualVM or other tools such as eclipse MAT. You need to convert it to a format that these tools can analyze. For this you have to run the following command.

hprof-conv Snapshot_2015.04.10_19.37.29.hprof heapissue


Here the first parameter is the android heap dump and the second is the output file.


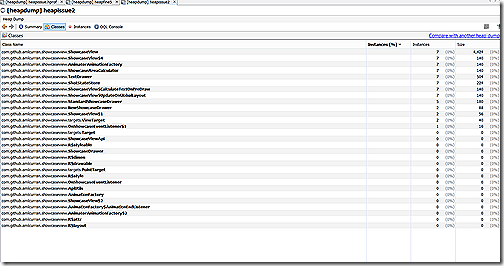
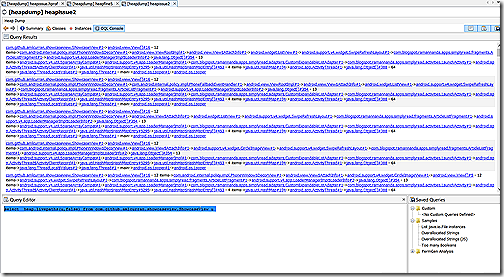
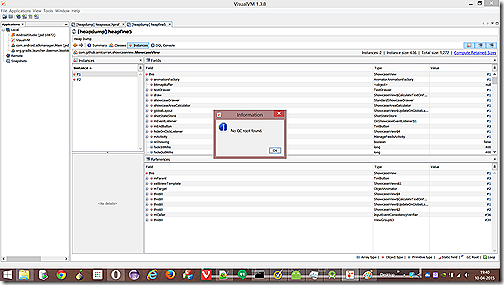
After loading the file into VisualVM for analysis, I could see the references of ShowCaseView class were being retained as it had GC roots, thus live references, which meant that the instances could not be collected by the JVM Garbage collector.


heap_issue_1


Simple OQL analysis revealed live paths to the instances.


Query:


select  heap.livepaths(u,false) from com.github.amlcurran.showcaseview.ShowcaseView u 


heap_issue_2


As you can see phone decor view was holding references to the view which was added by ShowCaseView.  Thus, the decorview was holding reference to ShowCaseView instances.


Now, Ideally whenever the view has been displayed it should be destroyed, especially,  if it is holding such large chunks of memory.  but, instead due to oversight from the developer instead of removing the view from decorview, he was just setting the views property to View.Gone, which only makes the view invisible and does not remove the view from the ViewGroup. 


The Solution


The problem was then clearly with the fact that the added views should be removed after the ShowcaseView was hidden.  So, I just modified the hide() and hideImmediate() methods to remove the views that were added on top of the decorView.


I have mentioned one of those method below.


@Override
public void hide() {
clearBitmap();
// If the type is set to one-shot, store that it has shot
shotStateStore.storeShot();
mEventListener.onShowcaseViewHide(this);
fadeOutShowcase();
getViewTreeObserver().removeOnPreDrawListener(draw);
if(Build.VERSION.SDK_INT>15){
getViewTreeObserver().removeOnGlobalLayoutListener(globalLayout);
}
else {
getViewTreeObserver().removeGlobalOnLayoutListener(globalLayout);
}
// removeView(ShowcaseView.this);
((ViewGroup)mActivity.getWindow().getDecorView()).removeView(ShowcaseView.this);
}


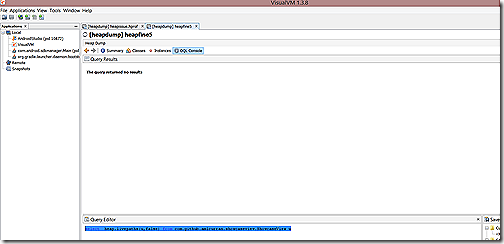
Post, implementing these changes the library works as it is supposed to work, that is just fine. 


heap_issue_fine_1


heap_issue_fine_2


showcaseview


Below, I have mentioned the Gist that contains the entire source code for the modified ShowcaseView. So, happy coding :-)


Posted on Friday, April 10, 2015 by Unknown

Mar 21, 2015

SSL handshake errors can occur due to various reasons such as Self Signed certificate, unavailability of protocol or cipher suite requested by client or server, etc.  Recently I faced this issue where I was connecting to third party server using HttpClient library.  Here’s what I did to identify the cause:-

Firstly, I enabled the debug flag for SSL,handshake and failure on  javax.net packages.

-Djavax.net.debug=ssl,handshake,failure


On examining the logs, I could see that the third party site was expecting a cipher key of 256 bits and the only supported keys in my glassfish server were of 128 bits length.  As it happens,  this occurs because OOTB java 6, 7 or 8 support only 128 bit encryption keys. To enable 256 or higher bit key length , you need to download the Java Cryptography Extension (JCE) Unlimited Strength Jurisdiction Policy Files which essentially contains two jars i.e US_export_policy.jar and local_policy.jar and place them in <JRE_HOME>/lib/security/ directory and restart the server to enable higher bit encryption keys.


The above step will enable  256 bit or higher bit encryption keys and will ensure that you do not face SSL Handshake errors due to key strength.


You can download the Policy files from the following links.


JCE Unlimited for java 6


JCE Unlimited for java 7


JCE Unlimited for java 8

Posted on Saturday, March 21, 2015 by Unknown

If you use ProGuard for obfuscating your code and happen to use Retrofit in your application, you will need to configure ProGuard to exclude certain Retrofit files from being obfuscated. Also you must note that if you are using GSON for conversion from JSON to POJO representation, you must ignore those POJO classes from being obfuscated, this is required as if those POJO class  field names are obfuscated, conversion to POJO’s from JSON would fail because POJO  field names are inferred from JSON response.   So to keep it brief you should use the following configuration.

-keep class com.squareup.** { *; }
-keep interface com.squareup.** { *; }
-dontwarn com.squareup.okhttp.**
-keep class retrofit.** { *; }

-keepclasseswithmembers class * {
@retrofit.http.* <methods>;
}

-keep interface retrofit.** { *;}
-keep interface com.squareup.** { *; }
-dontwarn rx.**
-dontwarn retrofit.**


#Here include the POJO's that have you have created for mapping JSON response to POJO for example
com.blogspot.ramannanda.apps.xyz.FeedlyResponse {*;}


Here FeedlyResponse is just a POJO class that maps to JSON fields returned by Feedly feed search API.

Posted on Saturday, March 21, 2015 by Unknown

Mar 4, 2015

I recently reviewed this title and found it short on a few important consideration such as cross client authorization. This is definitely a book for developers who are beginning android application development, but isn’t comprehensive.

I discuss about what each chapter covers and then offer suggestions later on how this book can be improved further.

Chapter 1: Android Security Issues

  1. Talks about the different security compliance standards 
  2. What are the common problems in android applications
  3. How one can easily re-engineer your applications code.

Chapter 2: Protecting your code
Here the author talks about why you should obfuscate your code. It starts by explaining how easy it is to re-engineer the code, if the code is not obfuscated. Obfuscation tools are then covered to show how to obfuscate your applications code. The author then talks about disassemblers to show that even though obfuscation might deter someone from looking at your code, It might not truly prevent someone from hacking your application code.

Chapter 3: Authentication
Here the author talks about different authentication schemes username/password, facebook login etc.

Chapter 4: Network communication
Talks about asymmetric public key encryption, Why you should use SSL security and demonstrates the Man in the middle attack. It also explains why your application should validate ssl certificates.

Chapter 5: Databases
Talks about general database best practices such as encryption and preventing SQL injection.

Chapter 6: Web Server Attacks
Talks about securing web services, XSS attack etc. Here, I feel the author should have covered authentication and authorization challenges that one usually faces with android applications, as one generally needs to implement validations of requests from mobile devices. For example, A user can easily know your service endpoint as the code is deployed on the client side and send a request to that URL from their application as well, So you need to differentiate between the request from your application and other applications.  (I personally use Google plus sign in API's, along with server side token validation to ensure that any back-end requests are originating from within my application and are from the correct individual)

Chapter 7: Third party library integration
Mentions that you should be aware of the permissions that you are granting to the third party libraries.

Chapter 8:Device Security
Talks about device security issues and why you should enable encryption. It then talks about how device security is enforced on Kitkat. The author then discusses some android version specific exploits and offers certain solutions.

Chapter 9: The Future
This chapter covers Intent hijacking and how to deal with it in your android application. The chapter then covers devices such as android wear and the extended ecosystem of android devices and its impact on security considerations. Furthermore, the chapter covers tools which expose security vulnerability in your application.

Conclusions:
The book covers a lot of common security vulnerabilities that developers expose while writing the android applications and has a lucid prose and demonstrates these vulnerabilities practically by showing examples. It also offers solutions to those problems. For a developer who is beginning application development with android, having knowledge about these issues is important.  However, most of these issues would be known to experienced developers. I feel the detailed coverage of topics such as securing back-end services unobtrusively, OAuth, OWSM,  etc could have added value to the book. Maybe its just me but I expect these topics to be covered in detail, as most of the android applications would be using some form of back-end service to offload heavy processing. I rate it 3.5 for the content it has covered. 

Posted on Wednesday, March 04, 2015 by Unknown

Feb 26, 2015

In this post, I will explain how you can use apache chemistry API’s to query the enterprise content management systems. Apache Chemistry project provides client libraries for you to easily implement integration with any of the content management products that support or implement CMIS standard. As you might be aware that there are multiple standards such as JCR and CMIS  for interacting with the content repositories. Although with JCR 2 support for SQL-92 is now available,  I really prefer the conciseness and wider adoption of the  CMIS standard, and the fact that Apache chemistry API’s really make it easy to interact with the content repository. 

I am sharing an example that you can readily test without any special environment setup.  Alfresco, is one of the vendors that provides a ECM product, which supports the CMIS standard. Alfresco, offers a public repository for you to play with.  I will cover this example on a piecemeal basis.

  1. Connecting to the repository
    SessionFactory sessionFactory = SessionFactoryImpl.newInstance();
    Map<String,String> parameter = new HashMap<String,String>();
    parameter.put(SessionParameter.USER, "admin");
    //the binding type to use
    parameter.put(SessionParameter.BINDING_TYPE, BindingType.ATOMPUB.value());
    parameter.put(SessionParameter.PASSWORD, "admin");
    //the endpoint
    parameter.put(SessionParameter.ATOMPUB_URL, "http://cmis.alfresco.com/s/cmis");
    parameter.put(SessionParameter.BINDING_TYPE, BindingType.ATOMPUB.value());
    //fetch the list of repositories
    List<Repository> repositories = sessionFactory.getRepositories(parameter);
    //establish a session with the first ?
    Session session = repositories.get(0).createSession();


    To connect to the repository, you require a few basic parameters such as the username, password, endpoint url (In this case the REST AtomPub service) and a binding type to specify which type of endpoint is it (WEBSERVICES, ATOMPUB, BROWSER, LOCAL, CUSTOM ) are the valid binding types. After we have this information , we still need a repository id to connect to. In this case, I am using the first repository from a list of repositories to establish the session. Now, let’s create a query statement to search for the documents.


  2. Querying the repository: 
    //query builder for convenience
    QueryStatement qs=session.createQueryStatement("SELECT D.*, O.* FROM cmis:document AS D JOIN cm:ownable AS O ON D.cmis:objectId = O.cmis:objectId " +
    " where " +
    " D.cmis:name in (?)" +
    " and " +
    " D.cmis:creationDate > TIMESTAMP ? " +
    " order by cmis:creationDate desc");
    //array for the in argument
    String documentNames[]= new String[]{"Project Objectives.ppt","Project Overview.ppt"};
    qs.setString(1, documentNames);
    Calendar now = Calendar.getInstance();
    //subtract 5 year for viewing documents for last 5 year
    now.add(Calendar.YEAR, -5);
    qs.setDateTime(2, now);
    //get the first 50 records only.
    ItemIterable<QueryResult> results = session.query(qs.toQueryString(), false).getPage(50);


    Here I have used createQueryStatement  method to build a query just for convenience, you could also directly specify a query string(not recommended). The query is essentially a join between objects. This sample code shows, how to specify the date (Line 14) and an array (Line 10) for the in clause as parameters.  Line 16 assigns the searched values to an Iterable interface, where each QueryResult is a record containing the selected columns.


  3. Iterating the results:

    for(QueryResult record: results) {
    Object documentName=record.getPropertyByQueryName("D.cmis:name").getFirstValue();
    logger.info("D.cmis:name " + ": " + documentName);

    Object documentReference=record.getPropertyByQueryName("D.cmis:objectId").getFirstValue();
    logger.info("--------------------------------------");
    logger.info("Content URL: http://cmis.alfresco.com/service/cmis/content?conn=default&id="+documentReference);
    }

    As explained above, we get a Iterable result-set to iterate over the individual records. To fetch the first value from the record (as there might be multiple valued attributes), I am using the getFirstValue method of the PropertyData interface.  Note Line 7 as it contains the actual URL of the resource, which is just a base URL to which the object id of the matched document is appended.


  4. Closing the connection ? As per the chemistry javadoc, there is no need to close a session, as it is purely a client side concept, which makes sense as we are not holding a connection here.


Viewing the results: To view the actual documents just use the URL’s generated by the log statement in the browser.


Building the code: Add the following dependency to maven for building the sample.


    <dependency>
<groupId>org.apache.chemistry.opencmis</groupId>
<artifactId>chemistry-opencmis-client-impl</artifactId>
<version>0.12.0</version>
</dependency>


Wrapping up: I have just covered one example of the CMIS Query API  and Apache chemistry to query for the documents. Kindly refer to the documentation links provided in reference section for other usages.  Below, is the gist that contains the entire sample code.


References:


CMIS_Query_Language Java Examples for Apache Chemistry

Posted on Thursday, February 26, 2015 by Unknown

Feb 20, 2015

Retrofit uses Google’s gson libraries to deserialize JSON representation to Java object representation. Although, this deserialization process works for most of the cases, sometimes you would have to override the deserialization process to parse a part of the response or because you don’t have any clear object representation of the JSON data.

In this post, I will share an example of a custom deserializer to parse the response from Wiktionary’s word definition API. First, let us take a look at the request and response.

The request URL is mentioned below:-

http://en.wiktionary.org/w/api.php?format=json&action=query&titles=sublime&prop=extracts&redirects&continue

The response is mentioned below, It has been shortened for brevity.

{"batchcomplete":"","query":{"pages":{"200363":{"pageid":200363,"ns":0,"title":"sublime","extract":"<p></p>\n<h2><span id=\"English\">English</span></h2>\n<h3><span id=\"Pronunciation\">Pronunciation</span></h3>\n<ul><li>\n</li>\n<li>Rhymes: <span lang=\"\">-a\u026am</span></li>\n</ul><h3><span id=\"Etymology_1\">Etymology 1</span></h3>\n<p>From <span>Middle English</span> <i class=\"Latn mention\" .......for brevity }}}}  


As, you can see the data we would be interested in is extract and probably the pageid. Now, as there is no straightforward object representation of this entire response in Java, so we would implement our own custom deserializer to parse this JSON response.


The code for the deserializer  is mentioned below.


public class DictionaryResponseDeserializer implements JsonDeserializer<WicktionarySearchResponse> {

@Override
public WicktionarySearchResponse deserialize(JsonElement json, Type typeOfT, JsonDeserializationContext context) throws JsonParseException {
Gson gson=new Gson();
JsonElement value = null;
value = json.getAsJsonObject().get("query").getAsJsonObject().get("pages");
WicktionarySearchResponse response = new WicktionarySearchResponse();
if(value!=null) {
Iterable<Map.Entry<String, JsonElement>> entries = value.getAsJsonObject().entrySet();
Query query = new Query();
ArrayList<ResultPage> resultPages = new ArrayList<ResultPage>();
for (Map.Entry<String, JsonElement> entry : entries) {
resultPages.add(new Gson().fromJson(entry.getValue(), ResultPage.class));

}
query.setPages(resultPages);
response.setQuery(query);
}


return response;
}
}


Pay special attention to the highlighted lines. On the first highlighted line, we are assigning the JsonElement with the value of the object that contains all the pages from the JSON response, as we are interested in only that data.  Next, we iterate the assigned value and as we are interested in the actual values and not the keys (as the key pageid is already present in the individual pageid objects), so we just use entry.getValue to obtain that and then transform it to a Java POJO instance using the GSON object instance.


Below, I have mentioned the service interface and an util class to invoke the word search API.


public interface DictionaryService {

@GET("/w/api.php")
public void getMeaningOfWord(@QueryMap Map<String, String> map, Callback<WicktionarySearchResponse> response);

@GET("/w/api.php")
public WicktionarySearchResponse getMeaningOfWord(@QueryMap Map<String, String> map);
}


/**
* Created by Ramandeep on 07-01-2015.
*/
public class DictionaryUtil {
private static final String tag="DictionaryUtil";
private static Gson gson= initGson();

private static Gson initGson() {
if(gson==null){
gson= new GsonBuilder().registerTypeAdapter(WicktionarySearchResponse.class,new DictionaryResponseDeserializer()).create();
}
return gson;
}

public static WicktionarySearchResponse searchDefinition(String word){
WicktionarySearchResponse searchResponse=null;
RestAdapter restAdapter = new RestAdapter.Builder()
.setEndpoint("http://wiktionary.org").setConverter(new GsonConverter(gson))
.build();
DictionaryService serviceImpl= restAdapter.create(DictionaryService.class);
Map queryMap=new HashMap();
queryMap.put("action","query");
queryMap.put("prop","extracts");
queryMap.put("redirects",null);
queryMap.put("format","json");
queryMap.put("continue",null);
queryMap.put("titles",word);
try {
searchResponse= serviceImpl.getMeaningOfWord(queryMap);
}catch (Exception e){
if(e==null&&e.getMessage()!=null) {
Log.e(tag, e.getMessage());
}
}
return searchResponse;

}


}


Below, I have mentioned the POJO classes. In order of hierarchy.


public class WicktionarySearchResponse {

private Query query=null;

public Query getQuery() {
return query;
}

public void setQuery(Query query) {
this.query = query;
}
}


public class Query {


public List<ResultPage> getPages() {
return pages;
}

public void setPages(List<ResultPage> pages) {
this.pages = pages;
}

private List<ResultPage> pages=null;


}


public class ResultPage {
private long pageId;
private String title;
private int index;
private String extract;

public ResultPage() {
}

public long getPageId() {
return pageId;
}

public void setPageId(long pageId) {
this.pageId = pageId;
}

public String getTitle() {
return title;
}

public void setTitle(String title) {
this.title = title;
}

public int getIndex() {
return index;
}

public void setIndex(int index) {
this.index = index;
}

public String getExtract() {
return extract;
}

public void setExtract(String extract) {
this.extract = extract;
}
}

Posted on Friday, February 20, 2015 by Unknown

Jan 15, 2015

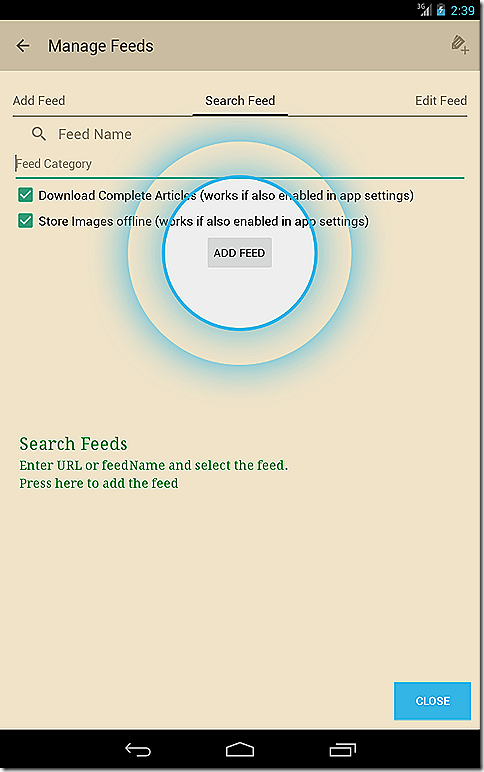
In the past few weeks, I had been working on an android application, for reading feed articles, there were quite a few takeaways from that experience and I am just sharing few of those, along with the link and features to the application. 

The app can be downloaded from the link: Simply Read on Play Store

Takeaways: -

  • Parsing is slow: As I had to design full text content scraper and parser for enabling the user to view the full content of articles, I soon realized the multiple iterations of parsing and scraping can be painfully slow.  The same thing that would execute in sub-second on local machine would take 30-40 seconds on an android device, which is unbearable for an end user.  Considering that my device was pretty fast, this could be attributed to performance snags with the standard java API implementation by Google.  Solution: Move the parsing code to the server, but provide the user an option to use the parser within the app,  create a rest service which returns the parsed article. can_encode_drill_down  can_encode_slow
  • Authenticating user requests:  This is an interlinked problem to the first one, when I had to move the parsing code to the server side, I needed to ensure that only authenticated user with the application send the parsing requests as I just could not allow everyone to query the backend and retrieve the parsed article.  Solution: Use Google+ sign in with server side validation of the client oauth tokens, this ensured that the requests originated from my application on an android device and the user was authenticated before making a parse request.
  • Not Using Content providers, So Managing Data Refresh: I chose not to use content providers and instead chose to go with the native API’s for fetching data from the SQLite database and doing the updates. The obvious problem that arises is to manage data refresh across different activities. Solution: I used otto coupled with the loaders to manage data refresh across activities. Using Otto ensured loose coupling of components.
  • ProGuard and Retrofit don’t gel well together:  There are quite a few standard exclusion rules that you would have to write to get retrofit to work with ProGuard.  Just make sure also to exclude classes and attributes that you are going to use with GSON to convert JSON to Object representation.  Here’s a snippet of the rules.
    -keepattributes Signature
    -keepattributes *Annotation*
    -keep interface com.squareup.** { *; }
    -dontwarn rx.**
    -dontwarn retrofit.**
    -keep class com.squareup.** { *; }
    -keep class retrofit.** { *; }

    -keepclasseswithmembers class * {
    @retrofit.http.* <methods>;
    }

    //now exclude the response classes and Pojo's
    -keep class com.blogspot.ramannanda.apps.simplyread.model.rest.SampleResponse {*;}


Although there are a lot of other takeaways. I am going to keep this brief and look forward to hearing your feedback about the app.


Posted on Thursday, January 15, 2015 by Unknown