Apr 29, 2009

The following are the simple steps that show how you can use telnet to configure your router/modem or to connect to a remote host and how to secure your modem:-

For configuring your modem/router:-
  • Open the Command prompt: start->run or (windows key+r), then type cmd

  • Now type telnet "the ip address of your gateway or modem or router". for example : In case you are configuring the modem connected to your pc directly then by default the router/modem's ip is configured to have a private address of 192.168.1.1 , so the command in this case will be telnet 192.168.1.1

  • Now fill in the username and press enter, then fill in the password and press enter. By default the username password pair is (admin, admin) or (admin, password) .

  • Now the menu containing options for your modem will appear as shown in the following figure. Note: there is also a hidden unix based shell in your modem which can be used to configure and access more information about your modem


  • Now you can pick any option, for example you can pick wan option and configure the wan connection and do other stuff like spoofing the mac address, the latter thing cannot be done if you access the modem through the browser because it won't provide access to such option.

Configuring the wan ppp connection:-

  • After following the aforementioned steps choose the option that corresponds to wan, in my case it is option 3 so type 3 in the -> prompt.

  • Then choose the configure option ( option 1).

  • Assign a VPI (Virtual Path Identifier) as used by your isp (0 for airtel, 0 for mtnl).

  • Assign a VCI (Virtual Circuit Identifier) as used by your isp (32 for mtnl) .

  • Assign a wan id you should leave this field as such and press enter.

  • Choose the category, our isp's generally use ubr ( some application use constant bit rate(cbr) )

  • Choose the protocol pppoe(ppp over Ethernet) or bridge if it's a bridge connection.

  • Choose the encapsulation LLC (logical link control) .

  • Choose enabled state for the interface .

  • Enter the service name, prefer to use the isp's name in the service name.

  • Enter the ppp username provided to you by your isp, it is generally your phone number.

  • Enter the ppp password provided to you by your isp.
    Note: You should password protect your modem, lest there is a simple hack that reveals your ppp password which can be used by even a novice cracker to use your account ( It still works on mtnl :-) ) [link] . Even if your isp account is attached to your modem's mac address then also spoofing can be done to crack and use your account. [link] . Below i mention a solution on how to password protect your modem and prevent such simple attacks.

  • Leave the idle timeout field blank and choose authentication method as auto .

  • Disable or enable the Internet group message protocol( IGMP) .

  • Disable the QOS service.

  • Disable the ppp ip address and then enter any name in pppoe service name.

  • Then press enter, choose exit option and then choose save and reboot option this will lead to the activation of the new wan configuration
Securing your modem:
  • Choose the passwords option after which a passwords menu will appear from which you should select the admin account.

  • Enter the old password, by default it is either "admin" or "password".

  • Enter the new admin password and confirm it. This step makes your modem more secure than before.

Posted on Wednesday, April 29, 2009 by Unknown

Apr 28, 2009

If you encounter the jdbc driver not found error in netbeans in spite of your jdbc code being absolutely flawless and the following type of error appears:-


com.mysql.jdbc.Driver

No suitable driver found for jdbc:mysql://localhost:3306/mydb


Then the solution that will fix this problem in netbeans is as follows:-
  • First select a project in which this error has occured, right click on it and choose properties.

  • Now in the categories window choose libraries, select compile tab, click on add library button, browse for the jdbc driver for your database, click on the add library button to add the library (in this case the jdbc driver) and then press ok. For example, in case you are using MYSQL database then browse and select the MYSQL database driver as shown in the figure below.


  • Now the last step is to recompile the code and your code will run without the "no suitable driver found error"

Posted on Tuesday, April 28, 2009 by Unknown

Apr 26, 2009

This is a collection of wallpapers made by consummate artists and photographers taken from various sources such as deviant art, torrents, etc. To save a wallpaper click on the image and then right click and choose save as.

1. Kingdom of heaven(1680*1050):


Kingdom of Heaven image


2. Never Again to Believe(1000*666):


3. Dark Bliss Wraith(1680*1050):


4. Sea mist software's (2560*1600):


5. Mountain and lake by ivinix trunten(1920*1200):


6. Sunset Gold and Blue by rehsup(1920*1200):


7.Windows7 wallpaper by arandas(1280*1024):


8. Awesome Windows 7 wallpaper(1680*1050):


9. Windows 7 wallpaper (1280*1024):


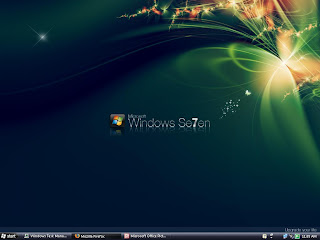
10. Windows7 Glow by dj Corny(download the rar file having various resolutions): The 1024*768 sample image is shown below.


Download link


Note: You may also want to see the following posts:-

1.How to disable the desktop to get the real amazing effect of wallpapers and
link

2.Download the windows xp visual themes
link

Posted on Sunday, April 26, 2009 by Unknown

Apr 25, 2009

Why disable the desktop?

The reason is simple, as you install software programs or download files on your desktop, it will become cluttered and you may end up cutting and pasting the files from the desktop into some other folder, this solution is okay but not good as you will have to move the contents from the desktop to some other folder on daily basis.

A better solution is to hide and disable all the items on the desktop this will insure not a single icon appears on your desktop and whenever you need to access some file from the desktop you can just go to My-computer and press the up button to view the contents of the desktop folder. This solution gives you empty desktop where you can place nice wallpapers and the desktop will appearance will be soothing and more stylish.

How to disable and hide all the files on desktop ?

Just follow these steps:-

  • Open the run prompt: start->Run or windows key+r

  • Open the group policy editor: type gpedit.msc in the run prompt.

  • Expand to the following setting :-
    User Configuration ->Administrative templates -> Desktop

  • Then From the right window view select "Hide and disable all items on the Desktop" and right click on it and choose properties. A new properties window will appear from it change the setting from not configured to enable and press ok and exit the group policy editor (as shown in the following figure).


  • Now there will still be icons and shortcuts being displayed on the desktop, So for the changes to take effect, open the windows task manager( ctrl+alt+del) and end the task explorer.exe

  • Don't panic! if you see nothing (this happens because explorer process has been terminated). Just open the task manager and then from the file menu choose new task and type explorer.Now the windows taskbar will appear and all the files on the desktop will be disabled and hidden.

Just to show you on how this setting gives a soothing effect take a look at my desktop. (Don't freak out ! it's just windows xp with the wallpaper designed for windows7).


Posted on Saturday, April 25, 2009 by Unknown

Apr 24, 2009

There is an better alternative to monitor the performance of your system than the task-manager, the alternative is the performance monitor(perfmon) . It lets you monitor hundreds of different critical system performance statistics and by knowing their threshold values and comparing them with the peak or average values that you are getting, you can diagnose and fix the problem.

How to use this tool ?

  • Open the command prompt and type perfmon or Open the run prompt(winkey+r) and type perfmon.msc.

  • One can then choose from two different views from the top panel i.e view graph or view histogram.

  • Extra parameters to be monitored can be added using the + icon from the top panel.You then have to choose the performance object that you want to monitor and then choose the counter that you want to monitor(as shown in the following figure).


  • To know about the counters that you want to monitor you can always select a counter and press the explain button.

  • To know more about the threshold values of the key counters and the performance object that you are monitoring, click on the help file icon the top panel, choose performance logs and alerts then click on checklist:monitoring performance. After going through the previous help checklist you will have sufficient knowledge on how to use this tool and the help file also provides you with key threshold values of some parameters, for example pages/sec must not exceed 20, if that is happening on an average basis then you might be suffering from low main memory problems but that cannot be concluded as it is affected by other parameters also.

  • You can always search Microsoft support for the counters you want to monitor and know more about them. The Microsoft support has excellent knowledge base articles that most people refer to.
Note:This tool by default gets its data from system registry, to get the data directly from Windows Management Interface you can append the /sysmon_wmi flag. Type perfmon /sysmon_wmi in the command prompt.

Posted on Friday, April 24, 2009 by Unknown

Apr 23, 2009

Here is a list of 10 cool addons for firefox

  1. Personas: This addon provides cool skins that can be changed at a click of the buttton. This is recommended for users that get bored from using the same skin and waste time downloading themes.

  2. Adblock plus and its add filters : Annoyed of advertisement content on torrent or other sites, well you don't have to watch those advertisements anymore. Once Adblock plus has been installed along with it's add filter subscription then advertisements are history. It basically prevents the advertisment images from loading.
  3. GreaseMonkey: It is a useful addon that can be used to develop your own greasemonkey javascripts or you can pick from thousands of grease monkey scripts to personalize a web site by adding extra functionality to the web site. The greasemonkey scripts just add extra elements to the website for your personalized experience.

  4. Firebug: Its a developer's tool. You can edit, debug, and monitor CSS, HTML, and JavaScript in any web page and view the DOM structure of a web page. A must have for web application developers.

  5. Cool Previews: It provides a previewing feature. Just point your mouse over a link for few seconds and a pop up window will display the preview of a web page.

  6. Mouse Less Browsing: This provides a good solution for browsing the web in case your mouse is not functioning properly.The basic principle it uses is that it adds small boxes with unique ids behind every link and/or form element. You then just have to type in the id to trigger the corresponding action.
  7. Google Previews: This is a great addon and saves your search time by inserting preview images and popularity ranks of web sites into the Google and Yahoo search results pages. So you can save your search time by just visiting the most popular websites but this concept is not always true because a site might be upcoming or new and might have better content then the highly ranked website.

  8. Alexa Sparky: This addon is helpful both for web site owners and normal users. It displays the alexa traffic ranking of a website which is a measure of how many page hits the site has (too bad i don't indulge in social networking and promoting my site which leads to low traffic inflow).

  9. All In One Gestures:This extension allows you to execute common commands using different kinds of gestures.

  10. ChatZilla: This is an IRC (Internet relay chat) client. It is very useful and easy to use and as it is integrated in firefox it saves your pc's main-memory as you don't have to launch an extra chat application.

Posted on Thursday, April 23, 2009 by Unknown

There are times when you are downloading something during the night and want to shutdown the computer after the duration of download, this can be done automatically in software's like utorrent but if you are using web browser based downloads, then to shutdown the pc after a certain specified time limit you can use the shutdown command.

Shutdown Command:-The command has ability to shutdown remote computers and the command also provides a large number of options. Most useful option is the time limit that can be set, most system administrators use this command in linux, unix or windows xp. Also a message can be displayed at the time of shutdown explaining the reason for shutdown.

The command:-

Usage: shutdown [-i | -l | -s | -r | -a] [-f] [-m \\computername] [-t xx] [-c "comment"] [-d up:xx:yy]

Options:-

No args Display the help message (same as -? or /?)
-i Display GUI interface, must be the first option
-l Log off (cannot be used with -m option)
-s Shutdown the computer
-r Shutdown and restart the computer
-a Abort a system shutdown(useful for aborting a planned shutdown)
-m \\computername Remote computer to shutdown/restart/abort
-t xx Set timeout for shutdown to xx seconds
-c "comment" Shutdown reason/comment (maximum of 127 characters)
-f Forces running applications to close without warning
-d [u][p]:xx:yy The reason code for the shutdown
u is the user code
p is a planned shutdown code
xx is the major reason code (positive integer less than 256)
yy is the minor reason code (positive integer less than 65536)

Example usage:-

If you want to shutdown computer after 3 hours then you have to convert the time into seconds and use the following command.

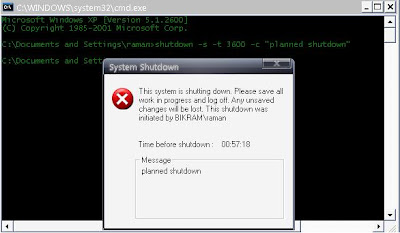
shutdown -s -t 10800 -c "planned shutdown"

The output will be like the following :-


You can always abort a initiated shutdown by opening the command prompt and typing shutdown -a.

Note: There is another utility TSSHUTDN available on windows xp that does the same thing but this utility is not available in Windows Vista.

Posted on Thursday, April 23, 2009 by Unknown

GG client or garena client is a gaming client for various games.

Important Features:-

  1. ***** It lists local servers near your location irrespective of the ISP you are using. So it helps in easy detection of low ping servers. This feature is accessible through garena fire.
  2. You can join online gaming rooms for the game that you are using.
  3. You can play ladder for the game . (basically you have to play well and rise through the ladder)
  4. You can watch live matches through garena Tv (It's better to watch matches through HLTV for Counter strike )

How to configure GG or Garena Client :-

  1. Download and install garena or gg client from the following link.
  2. Register with garena (registration is free) and after registration, log in with your username and password.

  3. Choose the "Settings" tab from the top menubar. In the settings menu choose "Game setings" and then expand the lan games and click on "counter strike 1.6".
  4. Now, click on browse button and choose a directory where hl.exe is installed i.e the installation game folder for cs1.6
  5. Then you must enter the following parameters in the game bootstrap parameters (i.e game launch options)
  6. -game cstrike -sv_lan 0 -noipx

    image here
  7. The last step ensures that you do not suffer from the connectivity error problems with the servers.
  8. Now open the garena fire tab from the left sidebar and choose counter strike 1.6.
  9. Now Choose a region like asia, africa whichever is close to your location and double click on any room to join that room.
  10. The last step is to click on garena fire tab as shown in the following figure and press search servers this will list all the servers near your location. You can set the ping limit of the servers to search. After the search is over you can double click on any server that has vacant slots and the game will be launched and you will be connected to the game server (refer to the following figure).


image here

***Note : In case you cannot connect to the server because of ipx error then you will have to exit the game and reconnect to the server through garena.


Posted on Thursday, April 23, 2009 by Unknown

Apr 19, 2009

The thing that i like about x-fire and the distinguishing feature from other game clients is that you can download free games and demos of almost every game at one place, so you have the ability to try out the game before buying the original or maybe downloading the pirated one :-)

Features :-
  • Ability to download both free games and demos of other games.

  • Automatic detection of installed games.

  • In game Screen shot taking ability (Scroll lock+ s).

  • In game Video Capture utility(Scroll lock+v) .

  • You can also upload the captured video directly to your profile page.

  • Standard features like chat, adding friends, joining the game your friend is playing.

  • Downloading game updates automatically.


Just follow these steps to install and run Xfire :-
  • Download the client from here

  • Run the setup and then register with Xfire.

  • Then login and the client will detect all the games that are installed automatically.

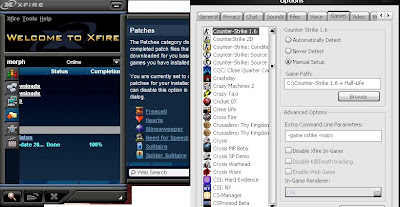
  • Then you can go into the tools -> options menu and select a game and change its start up parameters or to install a game that is not detected, just pick a game from the not installed list and choose manual install (as shown in the figure below).


    Xfire image


  • You can also choose find servers to detect the online servers for your game.
That's it Enjoy gaming :-)

Posted on Sunday, April 19, 2009 by Unknown

Apr 18, 2009

In this tutorial i would be telling you about how can you increase the page rank of your web page.

Basic Concepts:

a) Historical part :-


It is named page rank can you think why?

Many people would think it is named so because google ranks the web page according to this criteria so the word page rank should have been derived from this. Well those of you that think that aforementioned reasoning was correct then you are wrong because the name page rank comes from the founder of google "larry page" because he was the one who presented the first paper on how the page should be ranked. lol xD .

** b) What it is ?


The page rank is the criteria google or any other search engine will use to determine how important your web page is. Note that i have mentioned the word web page and not website.

The page rank is determined by the formula:-

PR (XYZ) = (1 – d) + d (PR (t1) / C (t1) + ... + PR (tn) / C (tn))

here
PR = PageRank
XYZ= Web page XYZ
d = A damping factor, usually set to 0.85
t1...tn = Pages linking to Web page A
C = The number of outbound links from page tn

Don't get into the details all that matters is you see what the formula intends to calculate and how.

See the part t1 t2 ... tn those are the pages that link to your site and it can be clearly seen that your page rank gets clearly affected by the number of pages that point to your page. It can be clearly seen that :-
"more the number of links pointing to your site better will be your page rank"


and also the number of out bound links from your page should be minimum as it decreases your page rank.

**** There is one more point to be considered as can be seen from the formula, the pages that point to your site must have high page ranks too.


How To Increase Page rank ?

Well now the big question is "how can you increase your page rank ?"

**Firstly, you can start by adding your site to primary search engines like google, yahoo, msn etc. then you should add your site to directories and if you have a blog then you should also add your blog to blog directories. I will be writing a blog on which site's you should add your site as a follow up to this post.

** Now the other thing you must do is post your page link in highly active forums of usenet, google groups and other forums. It is to be noted that you simply cannot add your link to the forums or groups as they will allow the link to be added only if you post a relevant solution to the problem being discussed.

**** One important thing is:-


"if you have a page that ranks very high then you should link that page to other pages on your site/blog"


Note: You should also see my post on what things not to do if you want your site to be listed on search engines and want higher page rank. Here's the link .

If this post was informational and helpful then do post your comments.

Posted on Saturday, April 18, 2009 by Unknown

It is easy to add a text area/ code box into your blogger site. You just have to use syntax highlighter and place the scripts and CSS in your dropbox account and then add them into the templates header. With that being said here are the steps in detail.

  1. Download syntax highlighter : Syntax Highlighter
  2. Extract the zip and place the folders/ files into the dropbox public folder.
  3. Go to your blogger account, then edit the templates html to add references to the brush and styles you would like to use. For example if you would like to use the Java code add reference to shBrushJava.js and if you would like to use themes add the appropriate reference to the stylesheet.
  4. The code snippet below shows how to add the scripts in the templates <head> section
    <link href='https://dl.dropboxusercontent.com/u/<yourusername-goes-here>/styles/shCoreDjango.css' rel='stylesheet' type='text/css'/> 
    <link href='https://dl.dropboxusercontent.com/u/<yourusername-goes-here>/styles/shThemeDjango.css' rel='stylesheet' type='text/css'/> 
    <script src='https://dl.dropboxusercontent.com/u/<yourusername-goes-here>/scripts/shCore.js' type='text/javascript'/> 
        <script src='https://dl.dropboxusercontent.com/u/<yourusername-goes-here>/scripts/shBrushCpp.js' type='text/javascript'/> 
        <script src='https://dl.dropboxusercontent.com/u/<yourusername-goes-here>/scripts/shBrushCSharp.js' type='text/javascript'/> 
    <script src='https://dl.dropboxusercontent.com/u/<yourusername-goes-here>/scripts/shBrushCss.js' type='text/javascript'/> 
    <script src='https://dl.dropboxusercontent.com/u/<yourusername-goes-here>/scripts/shBrushJava.js' type='text/javascript'/> 
    <script src='https://dl.dropboxusercontent.com/u/<yourusername-goes-here>/scripts/shBrushJScript.js' type='text/javascript'/> 
    <script src='https://dl.dropboxusercontent.com/u/<yourusername-goes-here>/scripts/shBrushPhp.js' type='text/javascript'/> 
    <script src='https://dl.dropboxusercontent.com/u/<yourusername-goes-here>/scripts/shBrushPython.js' type='text/javascript'/> 
    <script src='https://dl.dropboxusercontent.com/u/<yourusername-goes-here>/scripts/shBrushRuby.js' type='text/javascript'/> 
    <script src='https://dl.dropboxusercontent.com/u/<yourusername-goes-here>/scripts/shBrushSql.js' type='text/javascript'/> 
    <script src='https://dl.dropboxusercontent.com/u/<yourusername-goes-here>/scripts/shBrushVb.js' type='text/javascript'/> 
    <script src='https://dl.dropboxusercontent.com/u/<yourusername-goes-here>/scripts/shBrushXml.js' type='text/javascript'/> 
    <script src='https://dl.dropboxusercontent.com/u/<yourusername-goes-here>/scripts/shBrushPerl.js' type='text/javascript'/> 
    <script src='https://dl.dropboxusercontent.com/u/<yourusername-goes-here>/scripts/shBrushPlain.js' type='text/javascript'/> 
    
    <script language='javascript'> 
    SyntaxHighlighter.config.bloggerMode = true;
    SyntaxHighlighter.all();
    </script>
    
    
  5. After you have added the above scripts. To add for example, java code just place the escaped html code between the following elements.  <pre class="brush:java;"> //your code goes here </pre> . You can just change the brush type to xml for xml code, text for text box and so on. But, make sure that any xml/html code that you are placing is escaped, for this you can use any of the dozen utilities available online.
Note: I recommend using windows live writer, as it includes various plugins, including syntaxhighlighter and you don't even have to manually escape the code, It does it for you automatically. Also, it has various other advantages such as ability to write the posts offline with images and videos that are automatically uploaded when you post the item.

Posted on Saturday, April 18, 2009 by Unknown

Apr 17, 2009

I have already mentioned in my post windows tools a tool named C-cleaner for this sole purpose. But you can also delete a lot of junk files manually.

These are the places you should try to clear out and it is to be noted that not all the files can be deleted.
  • Just open the run prompt (windows key+r) or start-> run prompt and type %temp% to delete the temporary folder contents. Select all the files(ctrl+a) and delete them (Shift+delete).

  • Many people mention to delete the prefetch folder contents but i disagree because the prefetch files help launch your applications faster, in fact people change the registry prefetch settings to enable prefetch specifically for application, so do not delete the prefetch files. You may however want to delete its contents after 3-4 months because as you uninstall the applications it's prefetch file still remains.

  • Use Windows xp's clean utility :- Open the run prompt and type cleanmgr. Use this to delete the temporary Internet files and you may also want to compress old files because it clears out your hard disk space by essentially compressing old files.

  • Open your browser's and delete the history, cache and temporary files, but you may want to keep cache as pages load faster if you visit the same site frequently else you should definitely delete all of them as deleting them makes them run faster and clears out system space.
I would recommend to use the utility mentioned at the start of this post because it's a freeware and basically automates these clean up tasks for you and it also cleans up your windows registry.

Posted on Friday, April 17, 2009 by Unknown

Apr 16, 2009

Are you annoyed of motion blur that occurs in Need For Speed Most Wanted when the car goes at higher speeds ?

Well if you are then there is a simple solution of removing this annoying feature.This motion blur feature reduces your visibility when driving the car at high speeds.

Just follow these steps to remove the motion blur :-
  • Open Run prompt in windows (Windows Key+ r) .

  • Type regedit and press enter.

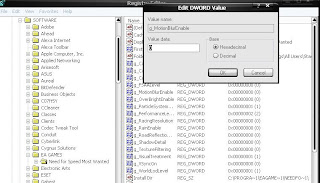
  • Then goto the following key "HKEY_LOCAL_MACHINE\SOFTWARE\EA GAMES\Need for Speed Most Wanted" on the right side the window will contain a number of options that you can set that which can't be set in game.

  • Select the key in g_MotionBlurEnable right click on it and set the value field to 0 and press ok. Use the figure shown below for help.


  • Image_need_for_speed_settings


  • Reboot is not required but in case the motion blur is not turned off do reboot your computer.
Note: This tutorial can be used for turning of other features like particle system ,rain, etc.


need_for_speed_image_1need_for_speed_image_2

Posted on Thursday, April 16, 2009 by Unknown

Apr 15, 2009

What is tree utility?

The tree utility in windows xp provides a hierarchical display of files and directories under a current directory.

What's the use ?

Well one can argue that we can use the dir command with /s switch to print list of all the files and directories under the current directory, well obviously you can use it but the dir command does not provide a hierarchical display and hierarchical displays are easier to read or recognize hence one would definitely prefer the tree command over the dir command.

How to use it ?

The usage : TREE [drive:][path] [/F] [/A]

drive : Specifies the drive to examine.
path : it specifies the path to examine. It can be relative or absolute path.
/F: It displays the filenames in each directory as well as the directory names.
/A: It displays the output using standard ASCII characters, rather than extended ASCII characters that leads to a cool graphical appearance.

For example:

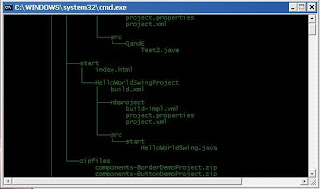
example 1 : Tree B:\java /F

It's Output:

tree-without-a-switch-image


Example 2) Tree B:\java /F /A


tree-with-a-switch-image

Posted on Wednesday, April 15, 2009 by Unknown

What is Subst Utility ?

This is a rarely known command line utility that can make a folder to appear as a Drive in windows xp. The Subst utility performs a task that you can’t perform within the Windows GUI i.e it is only a command line utility.

What's the use ?

It is very useful in case you access a directory a lot that is very deep in hierarchy and you have to make your way through a lot of directories. In that case you can just use this utility to make a folder appear like a directory.

How to use it ?

First you would have to open the command prompt.

The syntax of using the command is very simple It is mentioned and explained below:

Usage: SUBST [drive1: [drive2:]path]
For deleting :SUBST drive1: /D

drive1 : The name you want to give to the drive which will be containing the directory.
drive2 : The drive in which the directory is currently stored.
path: The path to the directory.
/D: It deletes the virtual directory.

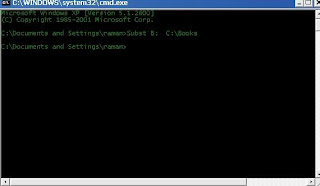
For example: Let's say you want to make C:\books appear as a separate drive in windows explorer with the drive letter as b for this you would type the following command :-

Subst b: C:\books

Subs-image


Note: Windows xp provides help for this command just type Subst /? for viewing help.

Posted on Wednesday, April 15, 2009 by Unknown

Do you want to display a custom welcome message or a warning message before you log into windows xp ? .If you want to then this can be accomplished in a very simple way.

Just follow these steps :-
  • Open run program prompt (Windows key+r).

  • Type regedit and then press enter.

  • Go to the following regsitry key "HKEY_LOCAL_MACHINE\SOFTWARE\Microsoft\Windows NT\CurrentVersion\Winlogon" .

  • On the right window pane just find the key LegalNoticeCaption and then right click on it and choose modify and type the title of the window you want to display in the value data field.

  • Now right click on the key LegalNoticeText(just below the legal notice caption key) and then type the text that you want the window to display at startup. The text could be a legal warning or you can type in a welcome message.

  • After this exit the registry editor and reboot your pc. On reboot before you login you will see the window containing the message that you typed.


Help-image

Posted on Wednesday, April 15, 2009 by Unknown

Prior to discussing server rates there is one thing of more importance , the thing is that when you play on amx_mod enabled servers you should reset your rates after playing on them because almost all of the servers have oaf admins that will unnecessarily mess up your client rates which will cause both lag and choke. I personally hate amx_mod for it causes lag by consuming resources and coupled with the admins messing up rates makes me frown.


How to set the rates (For dummies)?
Just press the ` character which opens up the console and then type the commands mentioned in the next sub section.


The following rates must be set for choke and loss free gameplay
:

  • cl_cmdrate : Ideally it should be set to the same rate as the fps you are getting. Fps in this case stands for (frames per second). you can always check the fps you are getting by typing the command net_graph 3 (you can use the value as 1 or 2 but 3 provides minimal display). So In case you are getting 60 fps type cl_cmdrate 60 and in case you are getting 100 fps type cl_cmdrate 101.The default value is cl_cmdrate 30.

  • cl_updaterate : Just like the command rate it should be set to the fps you are getting.so for ex if you get 60 fps then type cl_updaterate 66 in console.

  • r_decals : This consumes your resources and some versions of non steam cs come with the default value of 4096 trust me reduce this value to 300 and it will reduce your lag considerably. Type r_decals 300 in console.

  • ** rate : It is the most important parameter this if set improperly will cause choke of 100 and loss of about 40. Set this to 25000 default value or 20000 anything below this value or greater than 25000 will cause choke and loss and hence lag. Type rate 25000 in console.

  • ex_interp : ex_interp should be equal to 1/updaterate. So for example if you have cl_updaterate 101 then you should set ex_interp .01 . Type ex_interp 0.01 in console or any other value depending upon your cl_updaterate value. Note: if you have low ping then set ex_interp 0.1 (that will help in your shots being fired earlier than your opponent's).


counter strike image

Posted on Wednesday, April 15, 2009 by Unknown

Apr 14, 2009

What is Path variable?

The path is the environment variable that lets you access executable's even if they aren’t in the current directory when working at the command prompt. It basically is like a import statement that tells windows where to find the appropriate command to be executed.

How to set the path variable ?

For a Single Session:-

you can set the path environment variable for a single session in this case as soon as you exit the command prompt the path that you add will be deleted.

Syntax for this : PATH [[drive:]path[;...][;%PATH%]

In this we add %path% so that the older path be appended or included in the new path.
; is used as a separator.

For example : path c:\temp;%path%

Permanently Setting up the Path:-

For this case follow these steps :-
  • Right click the my computer icon and select properties.
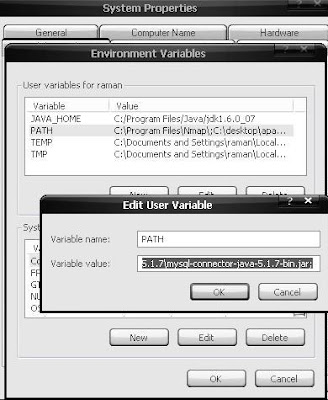
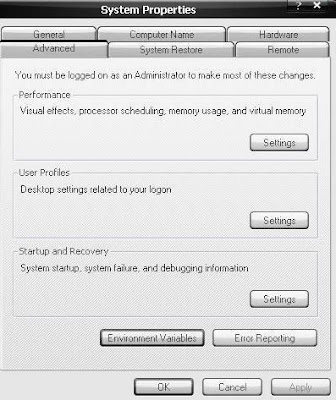
  • Then choose advanced tab and press the environment variables button (as shown in the figure).

properties image


  • Now select the path variable and press edit and then append your path. For example: in case you have to append the path of java installation for that append C:/Program Files/Java/jdk1.6.0_07; to your path variable.


path image


That's it reopen the command prompt and the command will work.

Posted on Tuesday, April 14, 2009 by Unknown

what is a traceroute application?

To put it in laymen terms it basically traces the route to the host you specify.It will print the addresses of the routers that it encounters between your computer and the destination host. for example in windows if you want to trace the route to let's say www.citibank.com you can type tracert www.citibank.com .

What is the use of this command ?

The traceroute command is a very helpful command in various cases for example you may want to verify the origin address of a spam mail and the route to the origin of mail and determine whether the mail was sent from a valid address or a fake address. In all these cases traceroute application is handy.
Here i will not mention the harmful ways in which the command can be used for breaking into the systems .

How to use the command ?

The output, results and functioning of command remain same in both unix and windows but they have different syntax and options for invoking the application.

Syntax in windows:-

Usage: tracert [-d] [-h maximum_hops] [-j host-list] [-w timeout] target_name

Options:
-d Do not resolve addresses to hostnames.
-h maximum_hops Maximum number of hops to search for target.
-j host-list Loose source route along host-list.
-w timeout Wait timeout milliseconds for each reply.

here target_name is the name of the destination host.

For example: tracert -h 16 www.citibank.com


Syntax in unix based systems
: traceroute <hostname|ip address>. Here the difference is in the syntax.To know more options about the command type man traceroute in the command line shell.

What to make of the output ?

Lets say you type traceroute www.citibank.com and the output is like the following:
(please enlarge view the image in a separate window/Tab).


Here everything looks fine except the * * * * in the output. Now what this * in the output simply means is that the router you are accessing is behind a firewall and so you do not see the details of the hostname and ip addresse of that router . But we can always find an alternate path to the host or we can try and exploit the host just prior to the one being blocked by firewall.

That just provides you with sufficient information about how to use the command.

Do post your comments or share this article if you find it helpful.

Posted on Tuesday, April 14, 2009 by Unknown

Daemons are programs that continuously listen for other processes. Daemons loosely resemble terminate and stay resident (TSR) programs in the Microsoft platform.These programs remain alive at all times, constantly listening for a particular event. When that event finally occurs, the TSR or Daemon undertakes some action.

What is Inetd Daemon in unix ?

Inetd daemon is the main daemon that listens for all other networking related processes running on unix system.It listens for connection requests from the void and when it receives a request it starts the corresponding process.When it receives a request, it evaluates it. This evaluation seeks to determine one thing only: What service does the requesting machine want? For example, does it want Smtp? If so, inetd starts the SMTP server process.

The behavior of inetd is generally controlled from a file called inetd.conf, located in
the /etc directory in linux and unix platforms.The inetd.conf file is used to specify what
services will be called by inetd. Such services might include FTP, Telnet, SMTP, TFTP,
Finger, Systat, Netstat, or any other processes that you specify.

Posted on Tuesday, April 14, 2009 by Unknown

In this tutorial, i will be explaining about how to verify your blogger site in google.
I presume the most obvious question is :-

why you should verify your site ?


The reason is that verifying your site gets you many extra features like the

following:

You can view:

  • Query stats about your site
  • Crawl stats about your

    site
  • Page analysis of your site
  • URLs from your site we were unable to crawl, and why we couldn't crawl

    them
These are important for your analysis of what kind of visitors come to your site and through

what search keywords. One could argue that similar functionality is provided by the google analytics tool. But still it

does not provide you all the features.

How to verify your site?

There are a couple of ways for verifying blogger only for google but this technique is generic and can be used for other

search engines as well.

Verify by adding Meta tag:

Follow these steps :-
  • Go to Google Webmaster

    tools.

  • Then click on the verify link corresponding to the site you want to verify.

  • Then select the Verification method as add meta tag and then copy the text from the field.

  • Then open a new tab and Login to the blogger account and choose Layout option->Edit HTML.

  • Then paste the code immediately after the head tag code as shown below (Tip :use ctrl-f to find the code).
  • <head>
    <b:include data='blog' name='all-head-content'/>

  • And then goto the webmaster tool window and press verify. Your site will be verified immediately.
Hope

this solves your problem. In case that you encounter error do post it .

Posted on Tuesday, April 14, 2009 by Unknown

This is a collection of premium wordpress themes. The themes are designed by woo themes and certain themes are not paid but are nice so i included them here.The list of themes is as follows :

Woo Themes:
  • ambience-dev
  • flashnews-dev
  • freshfolio-dev
  • freshnews-dev
  • gazette-dev
  • gothamnews-dev
  • livewire-dev
  • newspress-dev
  • openair-dev
  • overeasy-dev
  • papercut-dev
  • premiumnews-dev
  • proudfolio-dev
  • thick-dev
  • vibrantcms-dev
Others:
  • Aspire
  • Gridlock
  • Leia-En
  • GothamNights
I personally prefer to use freshnews it has got just the right mix of colors. You would have to slightly modify the style sheets of themes before they can be applied to your wordpress blog/site.

Download themes from here.

Posted on Tuesday, April 14, 2009 by Unknown

What is dmoz?

It's the largest open directory project where you can add your site for free.It takes 2 months for them to accept your request and the inclusion is not guaranteed but still you would want to give it a try to increase visits to your site and to increase your site's visibility.

How to add to the dmoz directory ?

Just follow these steps:
  • First visit dmoz.org

  • Then select the appropriate category in which you want your blog to be listed. for example if you have a search engine optimization blog you would want to add it in "Computers/Internet/Searching/Search_Engines" category.

  • Selecting the category is most important part as if you pick a wrong category then your site will not be included in the dmoz directory.

  • After finalizing the category, type this url in your browser "http://www.dmoz.org/cgi-bin/add.cgi?where=your complete category". Here replace "your complete category" with the category that you want to add your site to. For example lets say that you picked "Computers/Internet/Searching/Search_Engines" category then type "http://www.dmoz.org/cgi-bin/add.cgi?where=Computers/Internet/Searching/Search_Engines" in your browser navigation bar.

  • After the last step you will be displayed a form. Just fill in the details and submit your site for inclusion in the dmoz directory.
If this post was helpful then do post your comments.

Posted on Tuesday, April 14, 2009 by Unknown

In case you have a problem in mounting the usb drive in linux and you have tried the conventional mount command and checked the HAL daemon(red hat) but to no avail then it is most likely that 2 drivers for the same device are installed and are interfering with each other.

You can always check that what drivers are loaded by using the dmesg command. It is likely that 2 drivers namely uhci_hcd and ehci_hcd both are installed and if that is the case then to get rid of the problem simply remove any one of the modules and usb will mount properly.


Type this command for removing the module uhci_hcd:

modprobe -r uhci_hcd (-r option for removing a module)
for more of the commands option and info type man modprobe.

after typing this command connect your usb drive and it will be mounted without hassles.

Do post your comments in case the post solved your problem.

Posted on Tuesday, April 14, 2009 by Unknown

Here's a quick fix to disable the recent documents menu from windows xp.

Just follow these steps :-
  1. Remove caching of recently opened documents in recent documents folder.
  • Open run prompt (winkey+r)
  • Type gpedit.msc (The group policy editor) .
  • Then expand user configuration and select administrative templates.
  • After that select "start-menu and taskbar"
  • The window on the right provides various options that you can enable/disable. In this case scroll down to find "Do not keep history of recently opened documents" and then right click on it and enable it.
2. Removing the icon from start menu
  • Right click on start menu and then select properties.
  • Now select start menu tab and choose customize.
  • Then click on advanced tab and un-check "List my recently opened documents" at the bottom, then click ok and apply and then ok so as to apply these settings.
That's it now the recent documents icon will not appear on start menu and there will be no caching of recent documents in the recent documents folder.

Posted on Tuesday, April 14, 2009 by Unknown

These commands are generally used in .bat i.e batch files but you can use them to navigate your way through windows directories.

What are these commands?
These commands are just like the commands in a normal stack. Pop pops an item of the stack, in this case this command is POPD(read Pop Directory) pops to the directory you saved earlier using pushd command.
Pushd is used to store a directory that you want to later pop back to .

Why use them?

We use them because it saves a lot of typing that is typing the entire directory path and using cd command every time.

How to use them?

Pushd: Use pushd [path] .You can use pushd several times to push different directories onto netsh stack.You can also view the stack[netsh stack] contents by just simply using pushd command.
Popd: just use Popd it takes no parameters.

For example
if you were working on the the directory "C:\temp"
use "Pushd .." for storing the current directory.
then you can go on and work on other directory lets say c:\windows
after that you can directly return to directory C:\temp by typing
POPD or Popd these commands are case insensitive

Sample Output:


For adding a network share use the following command

pushd \hostname\share_name

This command will create a temporary drive letter that points to the network share and then as usual command prompt will change and point to that share.

Posted on Tuesday, April 14, 2009 by Unknown

In this tutorial i explain how to create the zombie mod server in counter strike 1.6.

Prerequisites:

It absolutely requires the following mods:

1.cstrike or czero mods

2. Hlds server

3.amx modx: It can be downloaded here. After you download it install it the amx mod site has good tutorial on how to install it.


The Zombie plague mod 4.2:


Download the zombie mod files from following places:

1.The main or core plugin can be downloaded from here. The installation is easy and does not require you to add any line of code, just extract the files into the respective folder.

2.The resources files: These files contain extra features like sounds,models etc . Download the file from here and extract into the specified folders and then restart your hlds server and you are done.Now play and kill those zombies :) .

do comment if the post was helpfull.

Posted on Tuesday, April 14, 2009 by Unknown

This Windows utility is used to repair the system databases in windows. Windows xp stores the databases with .sdb extension.
Databases like SecEdit.sdb (it keeps track of security settings),SysMain.sdb etc can be accessed by using this command line utility.


Modes of Operation

Defragmentation
ESENTUTL /d[options]

Recovery
ESENTUTL /r [options]

Integrity
ESENTUTL /g [options]

Repair
ESENTUTL /p [options]

Checksum
ESENTUTL /k [options]

File Dump
ESENTUTL /m[mode-modifier]

Copy
ESENTUTL /y [options]

Use this utility with caution it can corrupt the databases and then you may have to reinstall windows xp.


Explanation of Modes and Options :

1. Defragmentation mode :Defragmentation removes excess space from the database and can improve system performance by clustering the database together it is imperative that you backup the database before defragmenting the database file.

Options :
/p Preserves the temporary database. Generally, ESEnTUtl deletes the temporary database
once all of the changes are incorporated into the main database.

/b Creates a backup copy of the database prior to defragmentation
using the specified filename. It’s always a good idea to use this option so that you have another
copy of the database should the defragmentation fail.

For ex :
The Secedit.sdb file located in the C:\WINDOWS\security\Database folder can be derfagmented with backup file name abc.sdb as

esentutl /d secedit.sdb /b abc.sdb

The output should be like the following image:


2.Recovery mode:Recovery helps you overcome database errors. ESEnTUtl rebuilds the database using log entries hence log files must be there for recovery.

Options:

/l Defines the location of the log files used to recover the data. The default setting is
the current directory. Normally, you don’t need to change this setting because the log files
usually appear in the same directory as the database

/d[path] Defines the location of database files.

3. Integrity mode: Integrity checking verifies that the database is in an operational state and doesn’t contain any structural errors.

4. Repair mode: This mode changes the database by removing damaged entries and may also delete your security settings so backup before you use this mode.

5. Checksum mode : Checksum mode verifies that the file doesn’t contain any bit level errors. The checksum acts as a means of verifying the data itself is error free. Use both integrity and checksum check.

6. File Dump mode : This is the most important mode if you want to view information in the database files it has a options and a number of modifiers that are used with the \m they are explained below:

Options:

/t Performs a database dump for a specified table only

/v Provide verbose output.

Modifiers:
They help in determining the kind of data displayed in output like printing header information,viewing a checkpoint file ,log file etc.

they are used as /m[modifier]

H This is the default modifier. It obtains the database header information.
For example esentutl /mh Secedit.db .

k A checkpoint file uses the CHK file extension. This file contains a checkpoint in the database
transactions. A checkpoint is necessary for rolling back database to previous safe state.

l A log file uses the LOG file extension and normally appears in the same folder as a CHK or
SDB file

m It displays the Metadata that tells you about the content of a database like tables,columns etc.

7.Copy mode :Copying lets you create another copy of a log file, streaming file, or database in a secondary location.The default utility settings copy the data from a source location to the current location.

Use /d option followed by directory name to where you want to copy.

That's it, this tutorial is meant for advanced windows xp users.

Posted on Tuesday, April 14, 2009 by Unknown

The man or manual page in linux is used for providing the documentation of the commands in linux There are 8 sections into which man pages are divided. They are as Listed below:

Section Description
1 User commands
2 System calls
3 Library functions
4 Special files
5 File formats
6 Games
7 Conventions and miscellany
8 Administration and privileged commands


But sometimes you don't know which command to execute and for that kind of situation you can use the following commands:

1.apropos "keyword": This command prints the command names matching the keyword you specify and you can then open man page and read about the command and hence can easily know which command to execute without knowing the exact command name.

For ex: apropos print

2. man -k "keyword": This command produces the list of all the pages that match the keyword specified. Prefer apropos it's name makes much more sense and perhaps that is why it was designed .


To Print a man page use the following command

  • man -t sudo | lpr : what this command does is it prints the man page for sudo because here a pipe is used to redirect the output of man page to the printer using lpr command.


To convert a man page to pdf document use the following command

  • man -t sudo | ps2pdf -sudo_man_page.pdf : Here the ps2pdf command converts the output of man page of sudo command to pdf version.


Posted on Tuesday, April 14, 2009 by Unknown

Awp is the most powerful weapon in Counter Strike 1.6 and a good sniper can wreak havoc for the opposite team that being said it is also very difficult to use and ofcourse you need to be good at secondary weapon like deagle. In the following tutorial i will be explaining about certain commands that will help you while using it followed then by a video made by an experienced awp player 1 nkz.

The commands:

1. zoom_sensitivity_ratio: Its the sensitivity of the awp when scope of awp is opened.The default value is 1.0 and mostly cs versions now have 1.2 as default but players with high sensitivity of mouse should lower this value to .77 or lower depending upon how high their mouse sensitivity is. Now this helps in good registry of shots for players that have higher mouse sensitivity . If you feel that you have messed it all up you can always revert it to default using the revert command i.e revert zoom_sensitivity_ratio .

2. hud_centerid : When set to 1, what this command does is that it displays the player name by your crosshair and hence you can react faster and shoot even unzoomed, sometimes without even seeing his body default value is 0 which is not recommended because it slows your reaction time. So use hud_centerid 1 .

The Video:

This video shows awp techniques especially very important awp technique that is quick scoping, practice it hard its very effective in long range and lethal in short range. The map is nice and name of the map is aim_sk_awp there are other variants of the map for other weapons download them and practice on them they will certainly improve your aim.


Posted on Tuesday, April 14, 2009 by Unknown